

How to crop an image in the shape of a circle
Step 1: Open your photo
Start by opening your image in Photoshop. I will use this picture that you downloaded from Adobe Stock:

Step 2: Convert the background layer to a normal layer
If we look at Layers panel , we see our picture sitting on background layer :
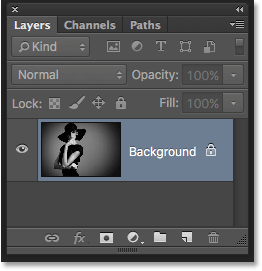
Before we can crop our image into a circle, we first need to convert the background layer into a regular layer. The reason is that we will need to be able to enclose our image transparently , but Photoshop doesn't allow transparency on background layer .
To convert the background layer into a normal layer, all we have to do is rename it. In Photoshop CC, you just click Lock Code to the right of the background layer in the Layers panel. In Photoshop CS6 or earlier, press and hold a key Alt (Win) / Option (Mac) on the keyboard and click Double click background layer.
Photoshop immediately renames the layer from "Background" to "Layer 0". This way, we've converted it into a regular layer and we're good to go:
Read also:Work with tabbed documents and floating windows in Photoshop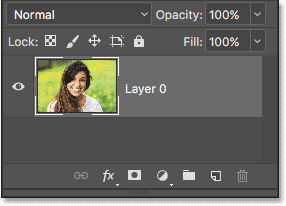
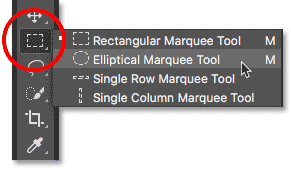
Step 3: Select the Elliptical Marquee Tool
Locate Elliptical selection tool from the toolbar. By default, the Elliptical Marquee Tool is nested behind the Rectangular Marquee Tool. Right click (Win) / Control-click (Mac) on the Rectangular Marquee Tool, then choose the Elliptical Marquee Tool from the fly-out menu:
Step 4: Draw a circular marquee outline
With the Elliptical Marquee Tool handy, click inside your image and drag an elliptical marquee outline. To force the selection outline into a perfect circle, press and hold a key Shift on the keyboard while dragging. Don't worry about locating the circle exactly right because we'll move it into position in the next step. For now, just make sure the circle is large enough to encircle the area you want to keep.
When done, release the mouse button, then release the Shift key. Make sure to release the mouse button first, ثم Shift key or selection outline will revert to a freeform ellipse:

Step 5: Reposition the selection outline if necessary
If you don't draw your selection outline in exactly the right place, simply click inside the selection outline and drag it into position. Here, I'm moving it around so that the girl's face is centered inside the circle. This is the area I want to keep. The rest of the image will be cropped:
Read also:How to make a group of layers in Photoshop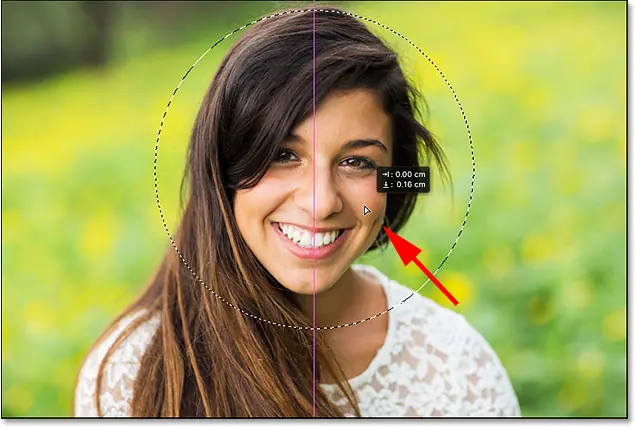
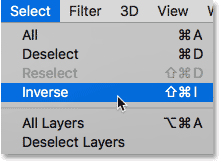
Step 6: Invert the selection
At the moment, the area inside the circle is defined. What we actually need is to define the area Out Circle.
To deselect the area inside the circle and select everything around it, go to Menu selection in the menu bar along the top of the screen and select reversed :
Step 7: Delete the area around the circle
With the selection inverted, press Backspace key (Win) / Delete (Mac) on the keyboard to delete the area around the circle. Photoshop fills the space In a checkerboard pattern , which is how Photoshop represents transparency:

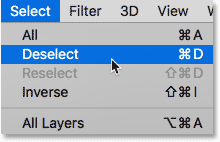
We don't need our selection scheme anymore, so to remove it, go up to Determination menu and selection Deselect :
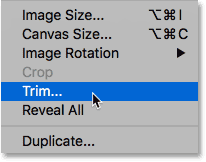
Step 8: Remove the transparent areas
To crop the image around the circle and remove all the transparent areas around it, go to Menu Image And choose Trim :
In the Trim dialog box, choose Transparent Pixels above. Then be sure to select TOP و Bottom و Left و Right Below (it should be by default):
Read also:Managing panels Photoshop CC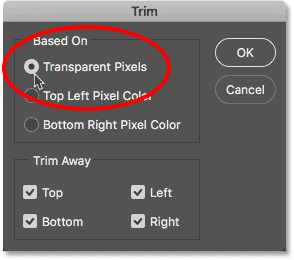
Click OK to close the Trim dialog box. Photoshop immediately crops the surrounding transparent areas, leaving us with our image cut out as a circle:

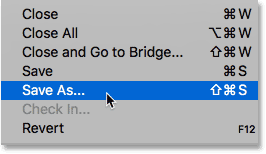
Step 9: Save the image as a PNG file
Normally, we save the image as a JPEG file, but JPEG does not support transparency. To preserve transparency in the corners and avoid filling them with white, save the cropped image as a PNG file that supports transparency.
To save it, go to the "menu" a file "choose" Save as" :
In the Save As dialog box, set an option Format on PNG . Name your file and choose where you want to save it, then click save :
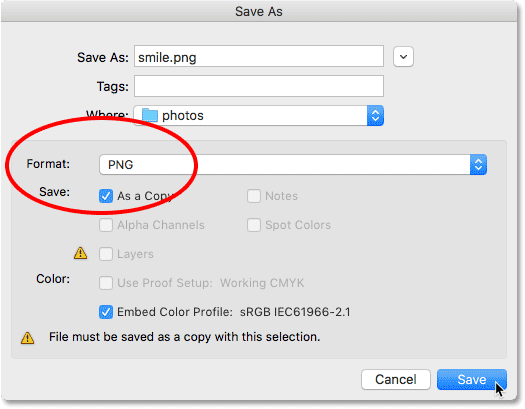
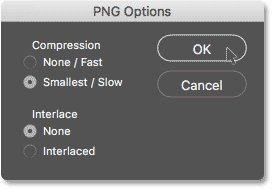
When Photoshop asks you to set PNG options, you can safely leave them at the default settings. Click OK to save the image: