

العمل مع المستندات المبوبة والنوافذ العائمة في Photoshop
جدول المحتويات
فتح الصور في برنامج فوتوشوب
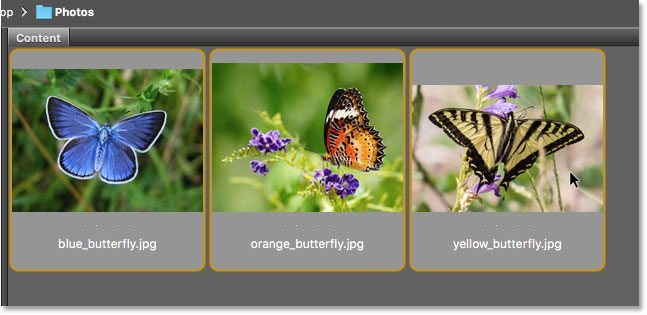
قبل أن ننظر إلى المستندات المبوبة والعائمة ، دعنا أولاً نفتح بعض الصور في Photoshop . لقد استخدمت هنا Adobe Bridge للانتقال إلى مجلد يحتوي على ثلاث صور. أريد فتح كل منهم في وقت واحد في Photoshop. للقيام بذلك ، سأضغط على الصورة الموجودة على اليسار لتحديدها. بعد ذلك ، سأضغط مع الاستمرار على مفتاح Shift الخاص بي وسأضغط على الصورة على اليمين. يؤدي هذا إلى تحديد الصور الثلاث مرة واحدة ، بما في ذلك الصورة الموجودة في المنتصف. بعد ذلك ، لفتح الثلاثة في Photoshop ، سوف أنقر نقرًا مزدوجًا فوق أي من الصور المصغرة:
المستندات المبوبة
العمل مع المستندات المبوبة والنوافذ العائمة في Photoshop
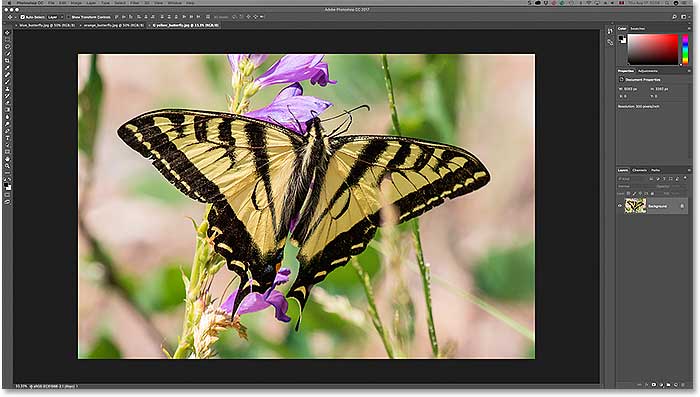
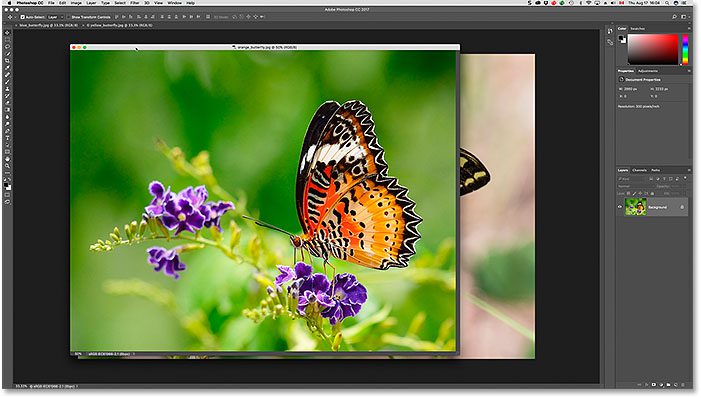
بشكل افتراضي ، يفتح Photoshop صورنا كمستندات مبوبة. سننظر إلى ما يعنيه ذلك بعد قليل. لكن للوهلة الأولى ، هناك شيء ما لا يبدو صحيحًا. لقد فتحت ثلاث صور ولكن اين هم؟ يتم عرض واحد فقط من الثلاثة على الشاشة ( صورة فراشة بشق من Adobe Stock):
علامات التبويب
العمل مع المستندات المبوبة والنوافذ العائمة في Photoshop
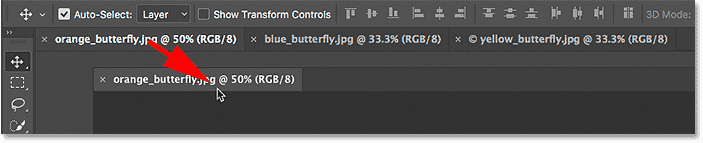
إقرأ أيضا:أوضاع شاشة Photoshop وخدع الواجهةقد لا يبدو الأمر كذلك ، لكن الصورتين الأخريين مفتوحتان أيضًا. لا يمكننا رؤيتهم في الوقت الحالي. ذلك لأن Photoshop فتح الصور كسلسلة من المستندات المبوبة. إذا نظرنا على طول الجزء العلوي من الصورة ، نرى صفًا من علامات التبويب . تمثل كل علامة تبويب إحدى الصور المفتوحة. يظهر اسم كل صورة في علامة التبويب الخاصة بها. علامة التبويب المميزة هي تلك النشطة حاليًا ، مما يعني أنها العلامة التي نراها على الشاشة. علامات التبويب الأخرى مختبئة خلفه وغير مرئية حاليًا:

التبديل بين المستندات المبوبة
العمل مع المستندات المبوبة والنوافذ العائمة في Photoshop
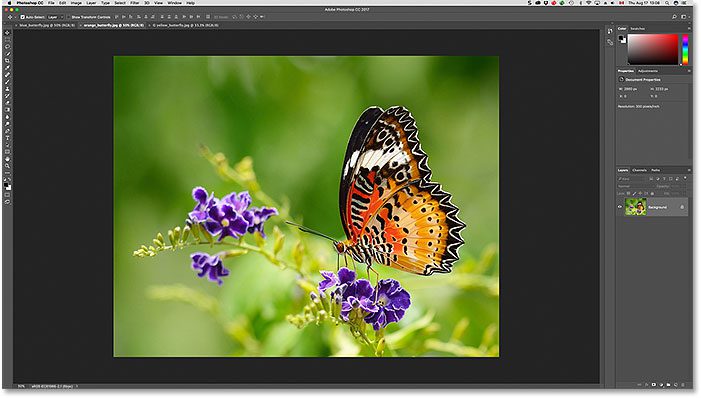
للتبديل بين المستندات المبوبة ، ما عليك سوى النقر فوق علامات التبويب. في الوقت الحالي ، صورتي الثالثة (علامة التبويب الموجودة على اليمين) نشطة. سأضغط على علامة التبويب في المنتصف لتحديدها:

والآن نرى صورة مختلفة على الشاشة. بشكل افتراضي ، يمكننا فقط عرض صورة واحدة في كل مرة. لذا فإن الصورة التي كانت مرئية منذ لحظة تختفي الآن في الخلفية ( فراشة على صورة زهرة من Adobe Stock):
سأضغط على علامة التبويب الموجودة على اليسار لتحديدها وتنشيطها:

والآن نرى الصورة الأخرى التي فتحتها ( صورة الفراشة الزرقاء من Adobe Stock):

التبديل بين المستندات المبوبة من لوحة المفاتيح
إلى جانب النقر فوق علامات التبويب ، يمكننا أيضًا التبديل بين المستندات المبوبة من لوحة المفاتيح. على جهاز كمبيوتر يعمل بنظام Windows ، اضغط على Ctrl + Tab للانتقال من اليسار إلى اليمين من علامة تبويب إلى أخرى. على جهاز Mac ، اضغط على Control + Tab . للتنقل بين علامات التبويب في الاتجاه المعاكس (من اليمين إلى اليسار) ، اضغط على Shift + Ctrl + Tab (Win) / Shift + Control + Tab (نظام التشغيل Mac).
تغيير ترتيب علامات التبويب
لتغيير ترتيب المستندات المبوبة ، انقر مع الاستمرار فوق علامة تبويب واسحبها إلى يسار أو يمين علامات التبويب الأخرى. حرر زر الماوس لإسقاط علامة التبويب في مكانها. تأكد ، مع ذلك ، من أنك تقوم بالسحب بشكل أفقي. إذا قمت بالسحب قطريًا ، فقد تقوم عن طريق الخطأ بإنشاء نافذة مستند عائمة. سننظر إلى النوافذ العائمة بعد ذلك:
إقرأ أيضا:كيفية تنزيل الصور باستخدام Adobe Bridge
نوافذ المستندات العائمة
الطريقة الأخرى لعرض صورك المفتوحة في Photoshop هي عرضها كنوافذ مستندات عائمة . لنفترض أن لديك عدة صور مفتوحة كعلامات تبويب ، كما أفعل هنا. لتحويل إحدى علامات التبويب إلى نافذة عائمة ، انقر فوق علامة التبويب ، وباستمرار الضغط على زر الماوس ، اسحب علامة التبويب لأسفل بعيدًا عن علامات التبويب الأخرى:
عندما تحرر زر الماوس ، تظهر الصورة في نافذة عائمة أمام المستندات المبوبة الأخرى. يمكنك تحريك النوافذ العائمة على الشاشة عن طريق النقر في منطقة علامة التبويب الرمادية على طول الجزء العلوي من النافذة ، ثم سحبها بالماوس مع الاستمرار في الضغط على زر الفأرة:
عرض جميع الصور المفتوحة كنوافذ عائمة
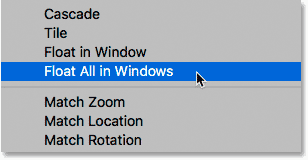
إذا كنت ترغب في تبديل جميع المستندات المبوبة إلى نوافذ عائمة ، فانتقل إلى قائمة Window في شريط القائمة على طول الجزء العلوي من الشاشة ، واختر ترتيب ، ثم اختر Float All في Windows :
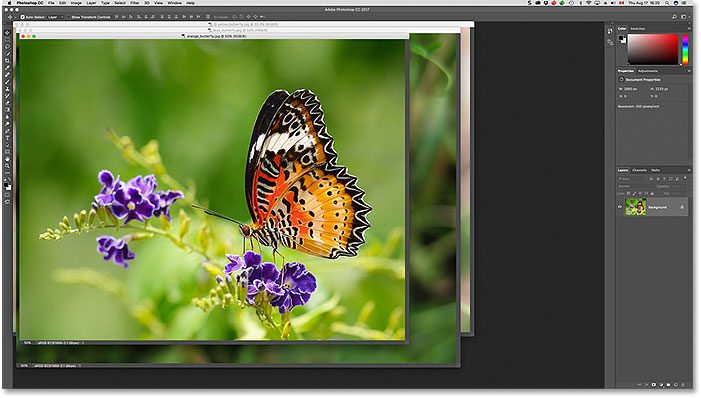
والآن تظهر جميع صوري الثلاثة في نوافذ عائمة ، مع عرض النافذة النشطة حاليًا أمام الآخرين. مرة أخرى ، يمكننا تحريك النوافذ على الشاشة لإعادة وضعها بالنقر فوق منطقة علامة التبويب وسحبها على طول الجزء العلوي من كل نافذة. لتنشيط نافذة مختلفة وإحضارها إلى الأمام ، ما عليك سوى النقر عليها:
عرض قائمة المستندات المفتوحة
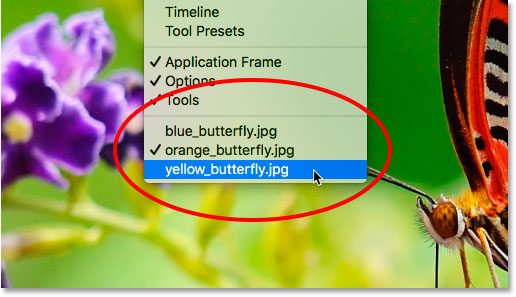
تتمثل إحدى المزايا الرئيسية لعرض صورنا كمستندات عائمة في أنه يمكننا رؤية أكثر من صورة في وقت واحد. لكن هذا يمكن أن يسبب مشاكل أيضًا. يمكن أن يؤدي فتح عدد كبير جدًا من النوافذ العائمة مرة واحدة إلى زيادة الفوضى على الشاشة. أيضًا ، يمكن لبعض النوافذ حظر الآخرين تمامًا من العرض. لحسن الحظ ، هناك طريقة سهلة لتحديد أي صورة مفتوحة في Photoshop ، حتى إذا لم تتمكن من رؤيتها.
اصعد إلى القائمة Window في الجزء العلوي من الشاشة. ثم انظر لأسفل في أسفل القائمة. سترى قائمة سهلة الاستخدام بكل صورة مفتوحة. الصورة النشطة حاليًا بها علامة اختيار بجانبها. انقر فوق أي صورة في القائمة لتحديدها ، مما يجعلها نشطة وإحضارها إلى المقدمة:
العودة إلى المستندات المبوبة
للتبديل من النوافذ العائمة إلى المستندات المبوبة ، انتقل إلى قائمة Window واختر Arrange ثم اختر Consolidate All to Tabs :
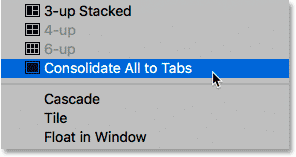
والآن تظهر صوري مرة أخرى كمستندات مبوبة ، مع صورة واحدة فقط مرئية في كل مرة:
ضبط تفضيلات Photoshop
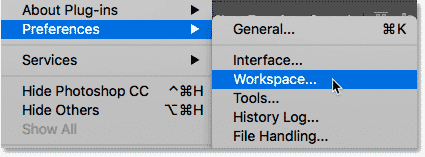
بمجرد تحديد نمط العرض الذي تفضله (المستندات المبوبة أو النوافذ العائمة) ، يمكنك إخبار Photoshop بفتح جميع الصور المستقبلية بهذا النمط باستخدام خيار موجود في التفضيلات. إذا كنت تستخدم Photoshop CC ، ثم على جهاز كمبيوتر يعمل بنظام Windows ، فانتقل إلى قائمة التحرير في الجزء العلوي من الشاشة ، واختر التفضيلات ، ثم اختر مساحة العمل . على جهاز Mac ، انتقل إلى قائمة Photoshop CC ، واختر التفضيلات ، ثم اختر مساحة العمل :
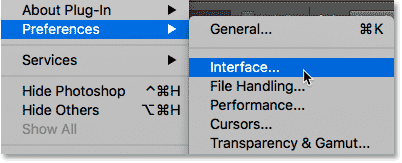
إذا كنت تستخدم Photoshop CS6 ، فعلى جهاز كمبيوتر يعمل بنظام Windows ، انتقل إلى قائمة ” تحرير ” ، واختر التفضيلات ، ثم اختر الواجهة . على جهاز Mac ، انتقل إلى قائمة Photoshop ، واختر التفضيلات ، ثم اختر Interface :
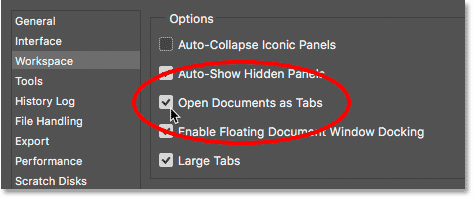
افتح المستندات كعلامات تبويب
يؤدي ذلك إلى فتح شاشة تفضيلات Photoshop المعينة إما على فئة مساحة العمل (Photoshop CC) أو فئة الواجهة (Photoshop CS6). ابحث عن الخيار الذي يشير إلى فتح المستندات كعلامات تبويب . بشكل افتراضي ، يتم تحديد هذا الفتح ، مما يعني أنه سيتم فتح جميع صورك كمستندات مبوبة. إذا كنت تفضل فتحها كنوافذ عائمة ، فقم بإلغاء تحديد هذا الخيار:
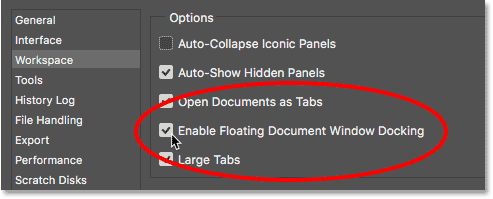
تمكين إرساء نافذة المستندات العائمة
يوجد خيار ثانٍ أسفله مباشرةً وهو مهم أيضًا. يتحكم Enable Floating Document Window Docking (قل ذلك بسرعة خمس مرات) فيما إذا كان بإمكاننا سحب نافذة عائمة إلى أخرى ودمجها معًا ، وإنشاء مستندات مبوبة داخل نافذة عائمة:
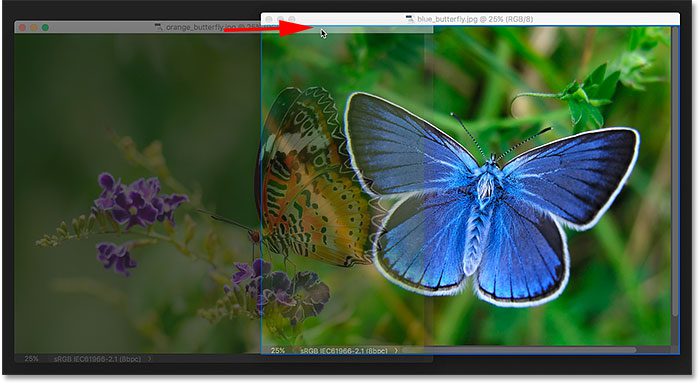
لأريكم ما أعنيه ، لدي هنا صورتان من صوري تفتحان جنبًا إلى جنب كنوافذ عائمة. سوف أنقر فوق منطقة علامة التبويب على طول الجزء العلوي من النافذة على اليسار وأبدأ في سحبها إلى النافذة على اليمين. عندما أسحب لأعلى باتجاه الجزء العلوي من النافذة على اليمين ، نرى مربع تمييز أزرق يظهر حول حوافه. يخبرني مربع التمييز هذا أنه إذا قمت بتحرير زر الماوس الخاص بي في هذه المرحلة ، فسيقوم Photoshop بإرساء كلتا الصورتين معًا داخل نفس النافذة العائمة:
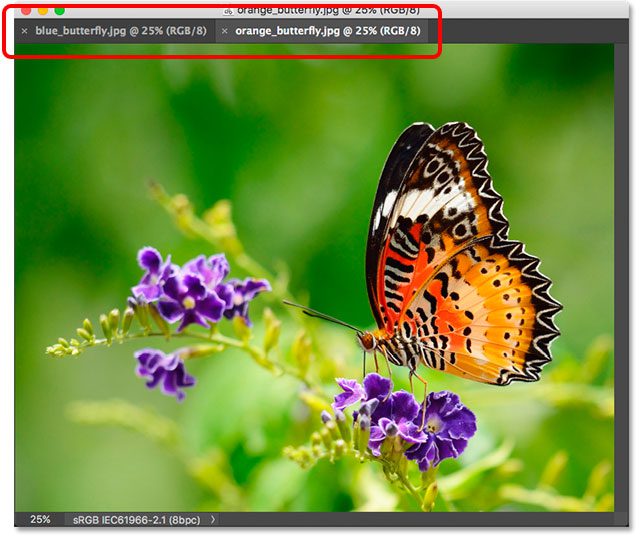
سأحرر زر الماوس ، والآن يتم تجميع كلتا الصورتين معًا كمستندات مبوبة داخل نافذة عائمة واحدة. يمكن أن تكون هذه ميزة مفيدة للحفاظ على الصور ذات الصلة منظمة على الشاشة. كما هو الحال مع المستندات المبوبة العادية ، يمكنني التبديل بينها بسهولة بالنقر فوق علامات التبويب الخاصة بها. لفصل الصور مرة أخرى ووضعها مرة أخرى في النوافذ العائمة الخاصة بها ، كل ما عليك فعله هو النقر على إحدى علامات التبويب وسحبها بعيدًا عن النافذة وخارجها ، ثم حرر زر الماوس:
يتم تمكين خيار Enable Floating Document Window Docking (محددًا) افتراضيًا. إذا قررت أنك لا تحب هذه الميزة ، فيمكنك إيقاف تشغيلها بسهولة عن طريق إلغاء تحديد الخيار في تفضيلات Photoshop.
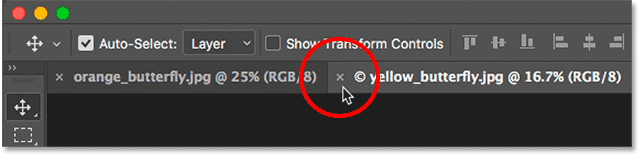
إغلاق مستند مفرد أو نافذة عائمة
أخيرًا ، لإغلاق صورة واحدة مفتوحة كمستند مبوب ، انقر فوق رمز “x” الصغير الموجود على حافة علامة التبويب الخاصة بها. على جهاز كمبيوتر يعمل بنظام Windows ، توجد علامة “x” على يمين علامة التبويب. على جهاز Mac (وهو ما أستخدمه هنا) ، ستجده على اليسار:
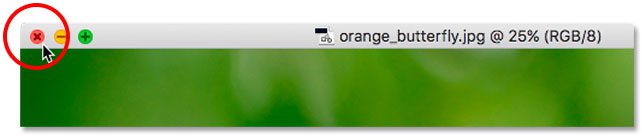
لإغلاق صورة مفتوحة في نافذة عائمة ، على جهاز كمبيوتر يعمل بنظام Windows ، انقر فوق رمز “x” في الزاوية اليمنى العليا من النافذة. في جهاز Mac ، انقر فوق رمز “x” الأحمر في الزاوية العلوية اليسرى:
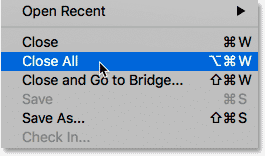
إغلاق كافة المستندات المفتوحة
ل إغلاق جميع الصور مفتوحة بغض النظر عما إذا كنت اعتبارهم علامات التبويب أو النوافذ العائمة، ترتفع إلى ملف القائمة في الجزء العلوي من الشاشة واختيار إغلاق الكل :