How to download images using Adobe Bridge
Step 1: Launch Adobe Bridge
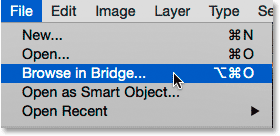
First, to download your images, open Adobe Bridge. the easiest way To start Bridge It's from Photoshop. Go to list Fillet (Photoshop) in the menu bar along the top of the screen and select Browse in Bridge :
Step 2: Launch the image downloader
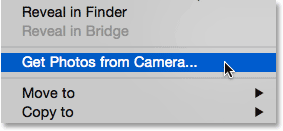
With Bridge open, launch Photo Downloader. As I mentioned, Photo Downloader is a separate application that is integrated into Adobe Bridge. To give your photo downloader something to download, make sure your camera or memory card is connected. Next, to open Photo Downloader, go to the “menu” a file (in Bridge) at the top of the screen and select “ Get pictures from the camera :
Another way to launch Photo Downloader is to click camera icon in Toolbar which runs along the top left of the Bridge interface:
![]()
Automatically start the photo downloader (Mac only)
Bridge can also launch Photo Downloader automatically when a camera or memory card is connected to your computer. But for whatever reason, this option is only available on Macs. Windows user can skip to step 3.
Read also:How to add an image to PhotoshopOn a Mac, when Photo Downloader is opened for the first time, Bridge will ask if Photo Downloader should launch automatically each time a camera or memory card is connected. Choose نعم Or not According to your personal preference. To prevent Bridge from asking this question every time you start Photo Downloader, choose Never show again Before making your choice:

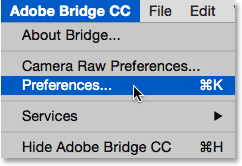
You can always change your mind later by turning the same option on or off in Bridge preferences. To open Preferences, go to List Adobe Bridge CC (or Adobe Bridge CS6 ) at the top of the screen and select Preferences (again, this is for Mac users only):
The Preferences dialog will open to General options. Look for the option that says When the camera is connected, launch Adobe Photo Downloader . Check or uncheck this option to toggle it on or off. Then click OK to close the Preferences dialog:

Step 3: Choose your camera or memory card
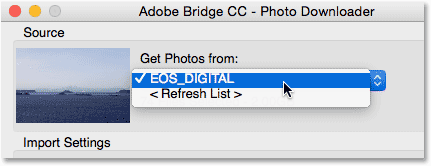
With Photo Downloader open, use the option Get photos from at the top to select the source of your images. The source will be either the camera or the memory card. Sometimes the image downloader automatically detects the right source for you. If not, choose the correct source from the list. If your camera or memory card is not in the list, make sure it is properly connected to your computer. Then, click on an option Update the list .
Read also:Explanation of Adobe BridgeIn my case, I have my memory card connected via a USB card reader. Since my photos were taken with a Canon camera, the card appears in the list as "EOS_DIGITAL". Your card may be named something different depending on the camera manufacturer:
Step 4: Switch to the advanced dialog
How to download images using Adobe Bridge
By default, Photo Downloader appears in what Adobe calls it Standard dialog . The standard dialog is a simplified version of Photo Downloader's interface. It gives us access to most, but not all, of the options available to us. The best option is to use Advanced Options dialog box . The advanced dialog isn't really 'advanced'. It gives us more options. To switch from the standard dialog to the advanced dialog, click the Advanced Dialog button at the bottom left of the dialog:

The Advanced Options dialog box includes all the options from the Standard dialog box, plus some additional and important features. We have it now Preview space Large Displays thumbnails of all the photos on your camera or memory card. We also have options at the bottom right to add Copyright information (metadata) to images as you download them:
Read also:Explanation of tools in Photoshop
Step 5: Select the photos you want to download
How to download images using Adobe Bridge
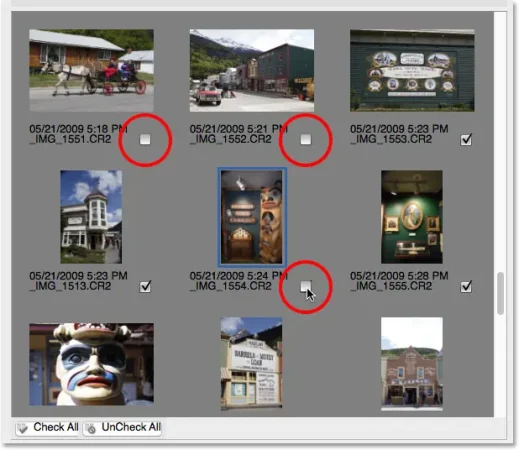
Besides allowing us to view images, the preview area also allows us to choose which images we want to download. In most cases, you'll want to download everything and then decide which photos are worth keeping later. But if you know for a fact that there are images that you don't need, there are two ways to prevent these images from being downloaded.
Below each thumbnail, along with the file name and the date and time of the snapshot, you'll see checkbox . Each image with a checkmark inside the box will be downloaded. By default, every image is scanned. If there are just a few images you want to exclude, just do that deselect it . Depending on how many images you have, you may need to scroll through them using the scroll bar along the right:
If there are more than a few images you want to exclude, it may be faster to deselect them all. Then, you can manually select the items you want to keep. To do this, click the button UnCheck All Below the preview area:
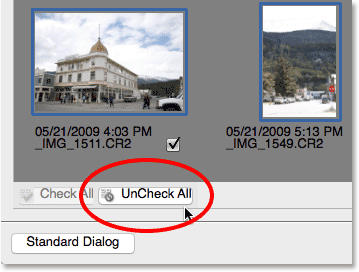
Next, press and hold Ctrl . key (Win) / Command (Mac) on your keyboard and click the pictures you want to download. Will appear Highlight box around each image you select. Once you've selected them all, click inside the checkbox of any of your featured images to select them all:

Step 6: Choose where you want to save the photos
Next, we need to specify the location on our computer where the image downloader should save the images. We do this in department Save options top right of the dialog box. Click the button Selection . Next, navigate to the folder or location where you want to save it. Here, I will save my file to a folder named “Photos” on my desktop. Ideally, you'll want to save your photos to a separate external hard drive, but I'm going to choose this folder for now:
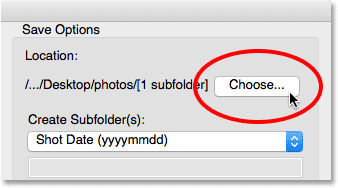
Step 7: Create a Subfolder for Pictures
To help keep your photos better organized, Photo Downloader will create a subfolder in the location you specified. It will then save your photos to the subfolder. By default, the subfolder will be named based on the date the photos were taken. Click the box below the words Create folder(s) Opens a list of predefined naming options for the folder. Most of the options are just differences in shooting history.
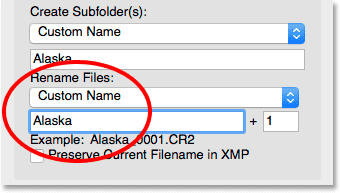
If you need something more specific, go for it CustomName from the list, then enter anything you want for the folder name. Since I took these photos in Alaska, I'm going to name my subfolder "Alaska". The Location section above updates to show a preview of the name you entered:

Step 8: Rename the files (Optional)
Photo Downloader also includes an option Rename files Which allows us to rename our images while they are being downloaded. While it may be tempting to rename it at this point, there are several reasons why I would recommend against doing so. The main reason is that you probably won't want to keep all of your photos once you've had a chance to look at them. Renaming the files first and then deleting the ones we don't like means we'll end up with commas in the naming sequence. It would be better to review the images first in Adobe Bridge. Then, we can delete the items that are not worth keeping, ثم Rename the guards.
Adobe Bridge also includes a feature Batch Rename That makes it incredibly easy to rename multiple files at once. Therefore, since we don't know which pictures to keep, and we can easily rename them later, it's not worth it to rename them here.
Choose a new file name
By default, the option to rename files is set to Do not rename files , so you can safely ignore it. But, if you need to rename them here, click the Rename Files box to choose from a list of predefined naming options. Again, most of the presets are variations of shooting history. There is also an option custom name Lets us enter our own name for the files. I'll choose the custom name, and then I'll enter "Alaska." An example of the new file name appears just below the Name field:
Set a four-digit extension and keep the original file name
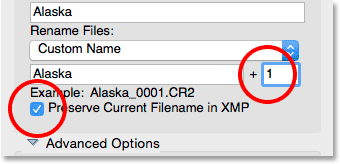
To the right of the name field is another field with a number. The number is the starting number for a four-digit extension It will be appended to the file names. The default value is 1, which means the sequence will start with “0001”. You can also enter your own value. Again, an example of the new name, with its four-digit extension, appears below the Name field. In my case, the files will be renamed starting with “Alaska_0001”.
If you want to include the original filename with the image, select the option Preserve current filename in XMP . If you change your mind and decide not to rename files, as I will, set the Rename files box back to Do not rename files :
Step 9: Advanced options
Just below the save options is a section Advanced Options . But strangely enough, you won't find any advanced options here. Instead, you will find the same four options that are also found in the standard dialog. These options are still important, so let's take a look at them. You may need to click on the words Advanced to rotate the partition to open it.
Open Adobe Bridge
The first option is in the “Advanced” section Open Adobe Bridge . Leave this option checked to open Bridge in the folder containing your images once the download is complete:

Convert to DNG
The next option is Convert to DNG . DNG stands for “Digital Negative” and is an Adobe version to the raw file format . If your camera supports the raw format and your photos were taken as raw files, it's best to select this option. This will convert your images from the camera raw file format to Adobe's DNG format as you download them. DNG files are smaller than the camera's original raw files, so they'll take up less space without any quality loss. DNG is also an open source format, which is not owned by any camera manufacturer. This can help keep your images compatible with future versions of Photoshop and other software. For reasons we'll look at in the Camera Raw section,
We'll learn more about the DNG format in another tutorial. For now, if you are familiar with DNG, keep this option checked, otherwise you can leave it unchecked. You can always convert your raw files to DNG later if you choose:
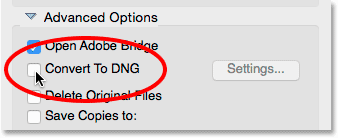
Delete the original files
The third option is Delete the original files . This will delete your photos from your camera or memory card once the download is finished. Leave this option off. Otherwise, you may lose your files forever if something goes wrong during the download process. The best course of action is to leave the files on your memory card until you can be sure they all made it to your computer safely. Then, to erase the photos, format the memory card in the camera the next time you go to shoot:

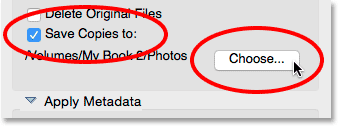
“Save copies in” option
fourth option, Save copies in , it will save a copy of your files in a second location. This is a great way to backup your photos and is highly recommended. Whenever possible, choose a separate hard drive, not the same hard drive as the original location. External hard drives work great. This way, if one hard drive fails, you'll still have a copy of your photos on the second drive. Enable the 'Save copies to' option by clicking inside its checkbox. Then click the button Selection Browse to the location where you want to save your backups. As you download images from your camera or memory card, the image downloader will save them both to your primary location (which you specified earlier) and to this secondary location:
Step 10: Add your copyright information
How to download images using Adobe Bridge
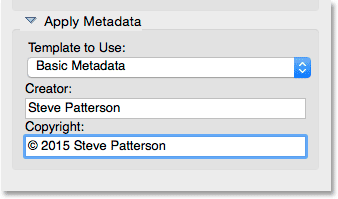
Finally, below the advanced options is a section Metadata application . This section is only available in the Advanced Options dialog. The metadata app allows us to add creator and copyright information to our images as we download them. Enter your name in a field originator . Then enter your copyright information in a field Copyrights . To add the copyright symbol ( © ), on a Windows PC, press and hold the key Alt And type 0169 on the numeric keypad for the keyboard. On a Mac, it's even easier. Just click on Option+Gon the keyboard. As we'll see in another tutorial, Adobe Bridge gives us other ways to add copyright and other metadata to our images, including the ability to create and apply metadata templates. For now, we'll keep things simple and stick to the basic options:
Step 11: Upload your photos
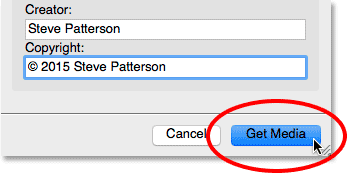
To download your photos, click the button Get Media in the lower right corner of Photo Downloader. Depending on the number of images, file size, and other factors, it may take some time to download. A progress bar will keep you updated on how things are going:
Once all of your images have been downloaded, Adobe Bridge will navigate to the folder containing the images so you can start sorting through them. We learn how to review our images using Bridge in the following tutorial:


