

Explanation of tools in Photoshop
Photoshop toolbar
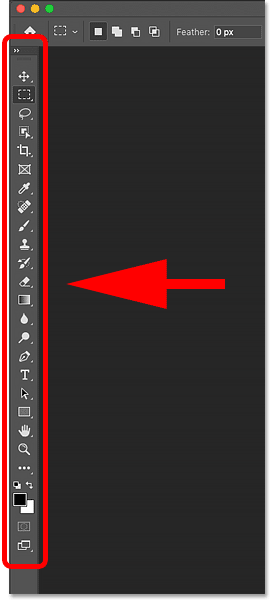
The Photoshop toolbar is located to the left of the screen:
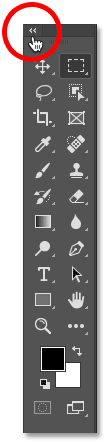
Choose single or double column toolbar
By default, the toolbar appears as one long column. But it can be expanded to a shorter double column by clicking double stock above. Click the double arrows again to return to the single column toolbar:
Tool planning
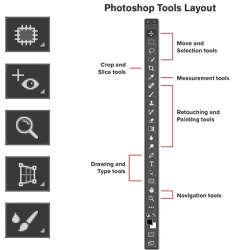
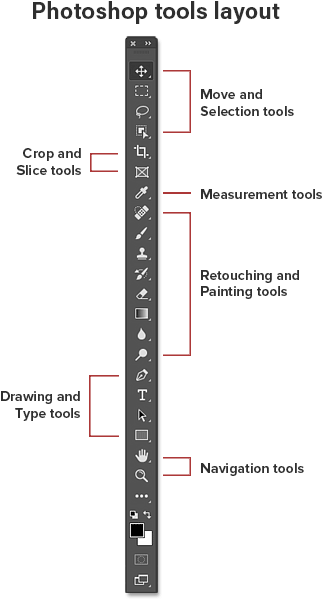
Let's look at how to organize the Photoshop toolbar. Although it may appear that the tools are listed haphazardly, there is actually a logical order to them, with related tools grouped together.
At the top, we have Photoshop Transfer و Selection Tools. And directly below it are Tools Crop Top and Slice . without it are Measurement Tools, followed by many Photoshop Correction و Mouth Tools.
Next she fee و Kind of Tools. Finally, we have tools Mobility At the bottom:
Hidden tools in the toolbar
Each tool in the toolbar is represented by an icon, and there are many more tools available than we see.
Read also:Explanation of Adobe BridgeMeans Arrow The little one in the lower right corner of the tool icon suggests that there are more tools hiding behind it in the same place:
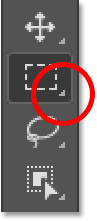
To view additional tools, Click and hold above the icon. or Right click (Win) / Control-click (Mac) on the icon. A pop-up menu will open listing other available tools.
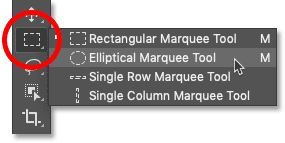
For example, if I tap and hold the rectangular marquee tool icon, a pop-up menu tells me that along with this tool
The Elliptical Marquee Tool, the Single Row Marquee Tool, and the One Column Marquee Tool are also grouped together.
To choose a plug-in, click on its name in the list. I'll choose the Elliptical Marquee Tool:
default tool
The tool that is initially displayed is known everywhere in the toolbar with the default tool . For example, the Rectangular Marquee Tool is the default tool for the second place from the top. But Photoshop won't always display the default tool. Instead, it will display the last tool you selected.
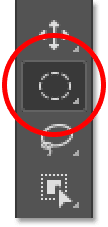
Read also:Managing panels Photoshop CCNote that after choosing the Elliptical Marquee Tool from the fly-out menu, the Rectangular Marquee Tool is no longer displayed in the toolbar. The Elliptical Marquee Tool has taken its place:
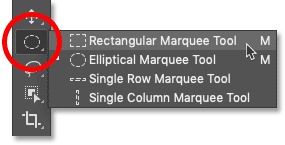
To select the Rectangular Marquee at this point, I'll need either the Tap and hold , Or Right click (Win) / Control-click (Mac), on the Elliptical Marquee Tool icon. Then I can select the marquee tool from the list:
Summary of Photoshop tools
Now that we've learned how to organize the Photoshop toolbar, let's look at the tools themselves.
Below is a quick summary of each Photoshop tool, along with a brief description of what each tool is used for. Tools are listed in order from top to bottom, and specific tools are covered in more detail in other lessons.
An asterisk (*) after the tool name indicates the default tool, and the character in brackets is the keyboard shortcut for the tool.
Read also:Make Photoshop your default image editorTo cycle through the tools using the same keyboard shortcut, press and hold Shift key while pressing the letter
. This list is updated as of Photoshop CC 2020. Note that some tools are not available in previous versions.
- Move and select tools

- Move Tool * (V)
- The Move tool is used to move layers, selections, and guides within a Photoshop document. Enable Auto Select to automatically select the layer or group you click on.

- Artboard tool (V)
- Artboard Tool allows you to easily design various web or UX (User Experience) layouts for different devices or screen sizes.

- Rectangular Marquee Tool* (M)
- The Rectangular Marquee Tool draws rectangular selection outlines. Hold Shift as you drag to draw a selected square.

- Elliptical Marquee Tool (M)
- The Elliptical Marquee Tool draws elliptical selection outlines. Hold down the Shift key to draw a selection in a perfect circle.

- Single row tent tool
- The Single Row Marquee Tool in Photoshop selects a single row of pixels in an image from left to right.

- Single pole tent tool
- Use the Single Column Marquee Tool to select one column of pixels from top to bottom.

- Lasso Tool * (L)
- With the Lasso Tool, you can draw a marquee outline around an object.

- Polygonal Lasso Tool (L)
- Click around an object with the Polygonal Lasso tool to surround it with a straight-edged polygon selection outline.

- Magnetic Lasso Tool (L)
- The Magnetic Lasso tool snaps a selection outline to the edges of an object as you move the mouse pointer around it.

- Object Selection Tool * (W)
- New as of Photoshop CC 2020, the Object Selection tool lets you select an object by simply dragging a rough selection outline around it.

- Quick Selection Tool (W)
- The Quick Selection Tool lets you easily select an object simply by painting over it with a brush. Enable Auto Enhance in the options bar to select a better quality.

- Magic Wand Tool (W)
- The Magic Wand tool in Photoshop selects areas of the same color with a single click. The Tolerance value in the options bar determines the range of colors that will be selected.
- Cutting and cutting tools

- Crop Tool* (C)
- Use the Crop Tool in Photoshop to crop an image and remove unwanted areas. Uncheck “Delete cropped pixels” in the options bar to crop the image non-destructively.

- Perspective Cropping Tool (C)
- Use the Perspective Crop Tool to crop an image and fix distortion or perspective problems.

- Slide tool (C)
- The Slices tool divides an image or layout into smaller sections (slices) that can be exported and enhanced separately.

- Slide Selection Tool (C)
- Use the Slice Select Tool to select individual slices created with the Slice Tool.

- Frame tool * (K)
- New as of Photoshop CC 2019, the Frame tool lets you place images in rectangular or elliptical shapes.
- Measurement tools

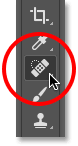
- eyedropper tool* (I)
- The eyedropper tool in Photoshop samples the colors in the image. Increase the Sample Size in the options bar to get a better representation of the color of the sample area.

- XNUMXD eyedropper tool (I)
- Use the 3D Material Eyedropper tool to sample material from a XNUMXD model in Photoshop.

- Color Sampler tool (I)
- The Color Sampler Tool displays the color values for the selected area (sample) in the image. Up to four regions can be sampled at one time. View color information in the Photoshop dashboard.

- Ruler tool (I)
- The Ruler Tool measures distances, locations, and angles. Great for placing photos and items exactly where you want them.

- Note tool (I)
- The Notes tool allows you to attach text notes in your Photoshop document, either to yourself or to others working on the same project. Notes are saved as part of a .PSD file.

- counting tool (I)
- Use the Count tool to manually count the number of objects in an image, or to have Photoshop automatically count several selected areas in an image.
- Retouching and drawing tools
- Spot Healing Brush Tool* (J)
- The Spot Healing Brush in Photoshop quickly removes blemishes and other small problem areas in an image. Use a brush a little larger than the size of the blemishes for best results.

- Healing Brush tool (J)
- The Healing Brush enables you to fix larger problem areas in the image by painting over them. Hold Alt (Win) / Option (Mac) and click to try a good texture, then paint over the problem area to fix it.

- Correction tool (J)
- Using the Patch tool, draw a free-selection outline around the problem area. Then fix it by dragging the selection outline over an area with a good texture.

- Content-Aware Move tool (J)
- Use the Content-Aware Move Tool to select and move part of the image to a different area. Photoshop automatically fills the hole in the original spot with elements from the surrounding areas.

- Red Eye Tool (J)
- The red-eye tool removes common red-eye problems in a photo caused by a camera flash.

- brush tool * (b)
- The Brush Tool is Photoshop's main painting tool. Use it to draw brush strokes on a layer or on a layer mask.

- Pencil Tool (B)
- The Pencil tool is one of the drawing tools in Photoshop. But while the Brush Tool can draw soft-edged brush strokes, the Pencil tool always paints with hard edges.

- color replacement tool (b)
- Use the Color Replacement Tool in Photoshop to easily replace the color of an object with a different color.

- Mixing brush tool (B)
- Unlike the standard brush tool, the mixing brush in Photoshop can simulate elements of real painting such as color mixing, blending, and paint wetness.

- Copy Stamp Tool * (S)
- The Clone Stamp tool is the simplest of Photoshop's retouching tools. It collects pixels from one area of the image and paints them on pixels in another area.

- Pattern Stamp Tool (S)
- Use the Pattern Stamp Tool to draw a pattern on the image.

- History Brush Tool * (Y)
- The History Brush Tool draws a snapshot from a previous step (the history state) to the current version of the image. Choose the previous state from the History panel.

- Art History Brush Tool (Y)
- The Art History brush also paints a snapshot of a past history state into the image, but it does so with stylized brush strokes.

- Eraser Tool * (E)
- The Eraser Tool in Photoshop permanently erases pixels on a layer. It can also be used to paint in a prehistoric state.

- Background Eraser Tool (E)
- The background eraser tool erases areas of a similar color in the image by drawing over them.

- Magic Eraser Tool (E)
- The Magic Eraser Tool is similar to the Magic Wand Tool in that it selects areas of a similar color with a single click. But Magic Eraser Tool permanently deletes these areas.

- Gradient Tool * (G)
- The Gradient tool in Photoshop draws a gradual blend of multiple colors. The Gradient Editor lets you create and customize your own gradients.

- Paint Bucket Tool (G)
- The Paint Bucket Tool fills an area with a color similar to the foreground color or pattern. The Tolerance value determines the range of colors that will be affected around the area you clicked.

- XNUMXD Material Dropping Tool (G)
- The 3D Material Drop tool, used for XNUMXD modeling, allows you to take a sample of material from one area and then drop it into another area of your XNUMXD model, mesh, or layer.

- blur tool *
- Blur Tool Blur and soften areas you draw with the tool.

- sharpening tool
- The Sharpen Tool sharpens the areas you paint over.

- smudge tool
- The Smudge Tool in Photoshop smudges and smudges the areas you paint over. It can also be used to create a finger paint effect.

- Dodge Tool* (O)
- Paint over areas of the image with the Dodge Tool to lighten them.

- burning tool (O)
- The clone tool will darken the areas you're drawing on.

- sponge tool (O)
- Paint over the areas with the Sponge Tool to increase or decrease the color saturation.
- Drawing and writing tools

- Pen Tool * (P)
- The Pen tool in Photoshop lets you draw very precise paths, vector shapes, or selections.

- Freehand Pen Tool (P)
- The Freeform Pen Tool allows you to draw freeform paths or shapes. Anchor points are automatically added to the path as you draw.

- Bend Pen Tool (P)
- The Curvature Pen Tool is an easier, simplified version of the Pen Tool. New as of Photoshop CC 2018.

- Add anchor point tool
- Use the Add Anchor Point Tool to add additional anchor points along the path.

- Delete the anchor point tool
- Click an anchor point along the path with the Delete Anchor Point Tool to remove the point.

- Point conversion tool
- In the path, click a soft anchor point with the Convert Point Tool to convert it into a corner point. Click a corner point to convert it into a smooth point.

- Horizontal Type Tool * (T)
- Known simply as the Type tool in Photoshop, use the Horizontal Type tool to add a standard type to your document.

- vertical writing tool (T)
- The Vertical Type tool adds type vertically from top to bottom.

- Vertical Type Mask Tool (T)
- Instead of adding editable text to your document, the Vertical Type Mask tool creates a selection outline in the form of vertical type.

- Horizontal Type Mask Tool (T)
- Like the Vertical Mask Type Tool, the Horizontal Type Mask tool creates a selection outline in the shape of type. However, the type is added horizontally, not vertically.

- path selector * (a)
- Use the Path Selection Tool (black arrow) in Photoshop to select and move the entire path at once.

- Direct Selection Tool (A)
- Use the Direct Selection Tool (white arrow) to select and move an individual path segment, anchor point, or direction handle.

- Rectangle Tool * (U)
- The Rectangle Tool draws rectangular vector shapes, paths or pixel shapes. Hold Shift while dragging to force the shape onto a perfect square.

- Rounded Rectangle Tool (U)
- The Rounded Rectangle Tool is similar to the standard Rectangle Tool but draws shapes with rounded corners. Hold down the Shift key to draw a square with rounded corners.

- Ellipse Tool (U)
- The Ellipse Tool draws elliptical vector shapes, paths or pixel shapes. Hold Shift as you drag to draw a full circle.

- Polygon Tool (U)
- The Polygon Tool draws polygonal straight-edged vector shapes, paths, or pixel shapes. Use the "Sides" option in the options bar to set the number of sides.

- Line Tool (U)
- The Line Tool draws straight lines, either shapes or paths. The Weight option in the options bar controls the line width.

- Custom Shape Tool (U)
- The Custom Shape tool in Photoshop allows you to select and draw custom shapes. Choose from custom shapes built into Photoshop or create your own.
- Navigation tools

- Hand tool * (H)
- The hand tool lets us click and drag an image around on the screen to view different fields when zoomed in.

- View rotate tool (R)
- Use the Rotate View Tool in Photoshop to rotate the canvas so you can view and edit the image from different angles.

- Zoom tool * (Z)
- Click on the image with the zoom tool to enlarge a specific area. Hold Alt (Win) / Option (Mac) and click with the Zoom Tool to zoom out.


