
Here's the open character in PhAdd a new articleotoshop. And as you can see, it looks very small:
![]()
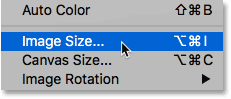
Step 1: Open the Image Size dialog box
The best way to enlarge pixel art is with Photoshop's Image Size screen. To open it, go to List Image in the menu bar and select Image size :
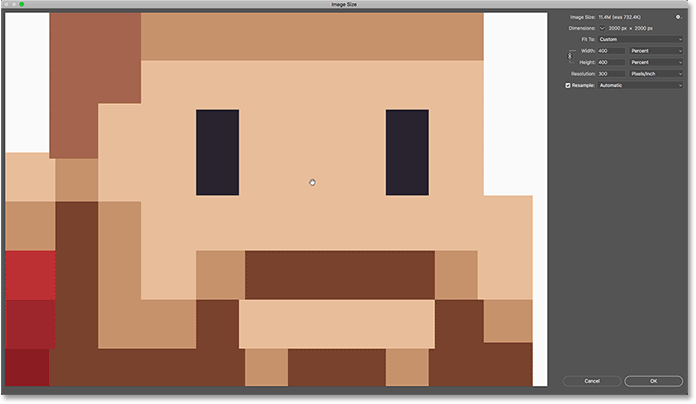
in Photoshop CC The screen includes a handy preview window on the left, along with image size options on the right:
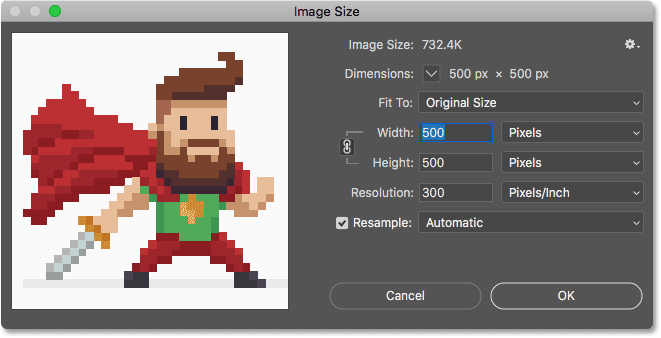
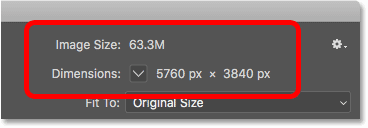
Display the current image size
The current size of the image is found at the top. next to the word الأبعاد , we see that my artwork is very small, only 500 pixels wide and high:
Step 2: Turn on the Resample option
Let's say I need to make my character a lot bigger. Maybe I want to use it in a poster or as a desktop background. To do this I will need to enlarge the artwork by adding more pixels.
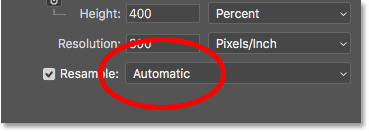
First, make sure that Reformation option in the transform dialog box on . With Resample off, the pixel dimensions are locked and all we can change is print size . To add or remove pixels, Resample must be running:
Read also:How to use the Navigator Panel in Photoshop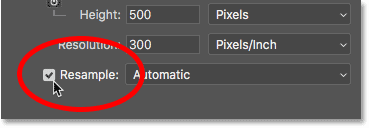
Step 3: Enter a percentage in the Width and Height boxes
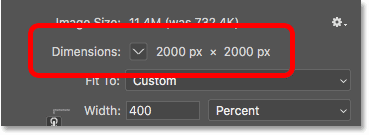
Instead of reducing pixel art to a specific size, the best way to enlarge it is with pixel art Percentages . In order to avoid distortions and keep every block in the artwork perfectly square, you'll need to stick to the percentages that are Multiples of 100 (ie 200%, 300%, 400%, and so on). I enlarge the image by setting both Display و Height To 400 percent :
![]()
This will increase the pixel dimensions from 500px by 500px to 2000 pixels × 2000 pixels :
Resize the preview window
Note that by making the Width and Height 4 times larger, the artwork is now too big to fit in the small preview window. To make the preview window bigger, I'll make the same image size dialog bigger by dragging out the bottom right corner. Next, click and drag inside the preview window to center the artwork within it:
So far, so good. or is it? If we look at the artwork in the preview window, we see that it doesn't look right. Instead of the edges around the shapes looking crisp and sharp, they appear soft and a bit blurred:
Read also:How to reset Photoshop preferences![]()
And if we look closely, we can see halos around shapes, especially in areas of higher contrast. I will zoom in on the artwork using Zoom buttons at the bottom of the preview window. And here, at 400% magnification, we can clearly see halos, especially around the character's eyes:
![]()
Note, however, that if you click hold On the artwork in the preview window, the halos will disappear and the edges will look very sharp, which is exactly what we want:
But once Release Mouse button, you will return to seeing halos:
![]()
Image interpolation method
The reason is that when you tap and hold in the preview window, you see the doubled artwork Before Photoshop applies any interpolation for the image . Interpolation is how Photoshop centers pixels together and smooths the result. When you release the mouse button, you see the artwork with the caret applied. It is the interpolation method that causes problems and creates the halo effect.
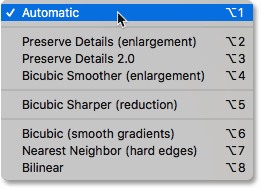
Read also:How to reset Photoshop preferencesو interpolation I found the right option to regroup a random sample. By default, it is set to automatic :
The Auto setting is usually good because it allows Photoshop to choose the best method for the task. But the problem here is that Photoshop assumes we're resizing a standard image with a lot of fine detail. So it is to choose a method that makes the standard image look good. But the same method makes pixel art and similar types of graphics look bad. So when downsampling pixel art, we need to choose a different interpolation method ourselves.
Step 4: Set the interpolation method to nearest neighbors
To do this, click on the interpolation option to open a list of methods that we can choose from. If you are using Photoshop CC, the interpolation method that Photoshop chooses to downsample is Preserve details . And in Photoshop CS6, he chooses Bicubic Smoother . But neither of them work well with pixel art:
To collate your artwork without averaging pixels, the interpolation method you need is nearest neighbor :
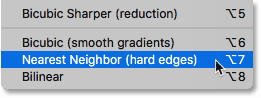
Once you choose the nearest neighbor, your artwork in the preview window will look crisp and sharp! And if you click and hold in the preview window, and then release the mouse button, you will see that this time, nothing happens. Artwork looks just as sharp as before After Apply the interpolation method.
That's because now The same The two-time interpolation method. Photoshop always adds pixels initially using the nearest neighbor. But now that we've chosen the nearest neighbors ourselves, we don't use anything else that will make the pixel image look worse:
![]()
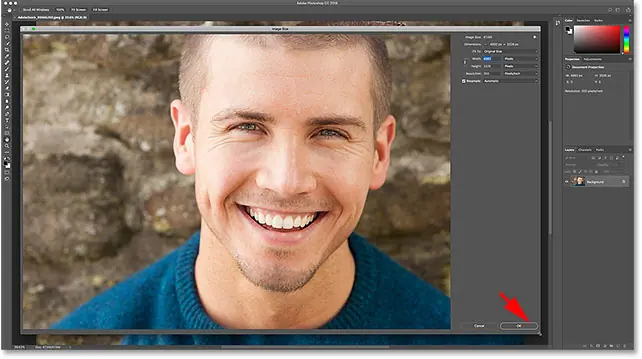
Step 5: Click OK
When you're ready to enlarge the artwork, click OK to accept your settings and close the Image Size dialog:
![]()
Now, my little pixel art hero looks a lot bigger, but still maintains the same blocky, pixelated look we were expecting:
![]()


