

كيفية استخدام مساحات العمل في Photoshop CC
جدول المحتويات
مساحة عمل Photoshop الافتراضية
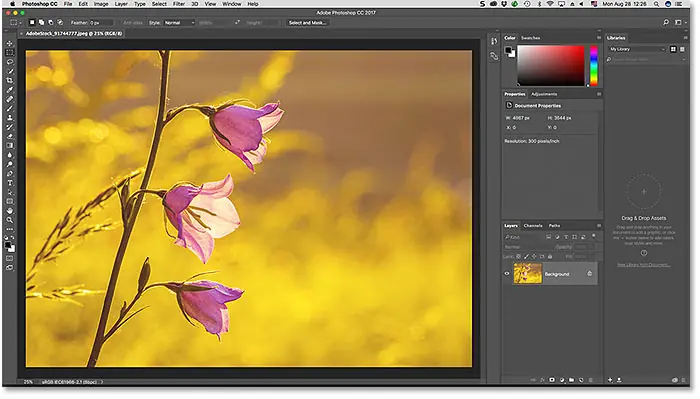
بشكل افتراضي ، يستخدم Photoshop مساحة عمل تُعرف باسم Essentials . إذا لم تختر مساحة عمل مختلفة من قبل ، فأنت تستخدم مساحة عمل Essentials. إنها أيضًا مساحة العمل التي نستخدمها في برامجنا التعليمية. الأساسيات هي مساحة عمل ذات أغراض عامة ومناسبة للعديد من المهام المختلفة. يتضمن بعض لوحات Photoshop الأكثر استخدامًا ، مثل Layers و Adjustments و Properties ، جنبًا إلى جنب مع لوحات Color و Swatches ( صورة زهور من Adobe Stock):
اللوحات الافتراضية
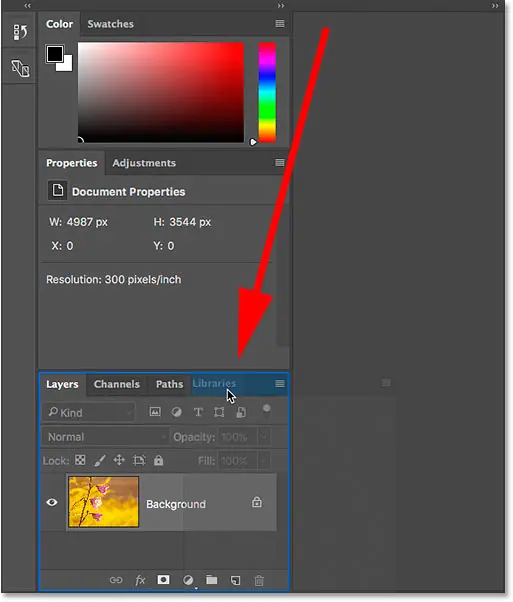
دعونا نلقي نظرة فاحصة على اللوحات الافتراضية. كما تعلمنا في البرنامج التعليمي Managing Panels ، توجد لوحات Photoshop في أعمدة على طول يمين الشاشة. في المكتبات لوحة، والجديد في فوتوشوب CC، يحصل العمود الخاص بها على أقصى اليمين. تم العثور على اللوحات التي نستخدمها أكثر ( الطبقات ، الخصائص ، اللون ، إلخ) في العمود الرئيسي في المنتصف. وعلى اليسار يوجد عمود ضيق يحتوي على لوحات History and Device Preview . بشكل افتراضي ، يتم طي اللوحات الموجودة في العمود الأيسر إلى رموز (ما يسميه Adobe العرض الأيقوني ). يمكنك توسيع لوحة في عرض أيقوني بالنقر فوق الرمز الخاص بها. انقر فوق الرمز مرة أخرى لطي اللوحة:
إقرأ أيضا:كيفية تغيير حجم الصور للطباعة باستخدام الفوتوشوب Photoshop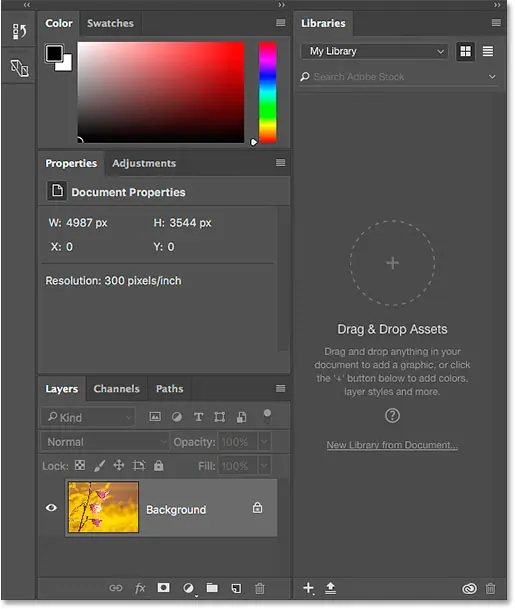
مساحات عمل Photoshop الأخرى
قد تكون المساحة الافتراضية ، لكن Essentials ليست مساحة العمل الوحيدة المضمنة في Photoshop. هناك مساحات عمل أخرى للاختيار من بينها أيضًا. مكان واحد للعثور على مساحات العمل الأخرى هذه في شريط القوائم على طول الجزء العلوي من الشاشة. اذهب إلى قائمة Window في شريط القوائم واختر مساحة العمل . جميع مساحات العمل المضمنة في Photoshop ( الأساسيات ، والأبعاد الثلاثية ، والرسوم والويب ، والحركة ، والرسم ، والتصوير الفوتوغرافي) في الجزء العلوي من القائمة. إذا قمت بحفظ أي مساحات عمل مخصصة (سنتعلم كيفية القيام بذلك لاحقًا) ، فستظهر أيضًا. تعني علامة الاختيار الموجودة بجوار الأساسيات أنه نشط حاليًا. لاختيار مساحة عمل مختلفة ، ما عليك سوى النقر فوق اسمها لتحديدها:

هناك طريقة أخرى للوصول إلى مساحات عمل Photoshop وهي النقر فوق رمز مساحة العمل في الجزء العلوي الأيمن من الواجهة (فوق أعمدة اللوحة مباشرةً):
![]()
هنا ، ستجد نفس قائمة مساحات العمل. تشير علامة الاختيار إلى مساحة العمل النشطة حاليًا. يمكنك اختيار مساحة عمل مختلفة عن طريق تحديدها من القائمة:
إقرأ أيضا:كيفية إعادة تعيين تفضيلات Photoshop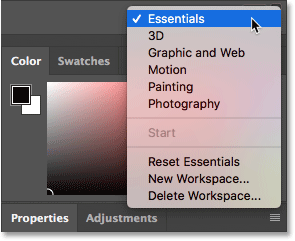
اختيار مساحة عمل مختلفة – تصوير
مع فتح القائمة ، لنجرب مساحة عمل مختلفة. سأختار مساحة عمل التصوير . كما يوحي اسمها ، تعد مساحة عمل التصوير اختيارًا جيدًا لتحرير الصور وتنقيحها:

يؤدي التبديل بين مساحات العمل إلى تغيير اللوحات المعروضة على شاشتك. لنلقِ نظرة على الاختلافات بين مساحة عمل Essentials الافتراضية في Photoshop ومساحة عمل Photography. لاحظ ، على سبيل المثال ، أن لوحة Libraries ، التي كانت في عمودها الخاص على اليمين في مساحة عمل Essentials ، تم تجميعها الآن في لوحة Adjustments في العمود الأوسط. هذا يوفر مساحة أكبر لعرض الصورة في نافذة المستند.
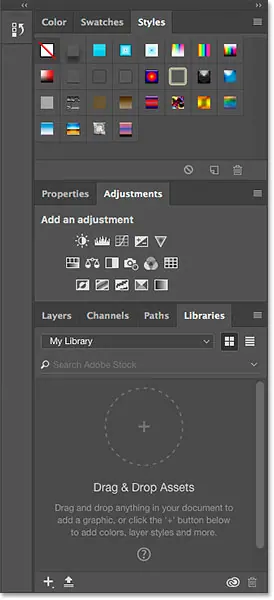
في مساحة عمل Essentials ، تم تجميع لوحتي Color و Swatches معًا في أعلى العمود الأوسط. ومع ذلك ، فقد تم استبدالها في مساحة عمل Photography بلوحتي Histogram و Navigator ، وهما لوحتان أكثر فائدة لتحرير العمل وتنميقه. أيضًا ، احتوى العمود الضيق الموجود على اليسار على لوحتين فقط في مساحة عمل Essentials ( History and Device Preview ). بينما تحتفظ مساحة عمل Photography بلوحة History ، تختفي لوحة Device Preview. في مكانها ثلاث لوحات جديدة ( تطبيقات ، معلومات ، و استنساخ المصدر ) جنبا إلى جنب مع خصائصلوحة ، كانت موجودة سابقًا في العمود الأوسط. في الواقع، فإن الشيء الوحيد الذي لم يتغير حقا بين مساحات العمل هو أن الطبقات ، قنوات و مسارات لوحات لا تزال تجميعها معا في الجزء السفلي من العمود الرئيسي:
إقرأ أيضا:كيفية نقل صور JPEG من Lightroom إلى Photoshop
مساحة عمل الرسم
لن أخوض في كل مساحة عمل هنا حيث يمكنك القيام بذلك بسهولة بمفردك. ولكن دعونا نجرب واحدة أخرى. لاختيار مساحة عمل مختلفة ، سوف أنقر مرة أخرى على أيقونة مساحة العمل أعلى يمين الواجهة. بعد ذلك ، سأختار مساحة عمل الرسم من القائمة:

مثل مساحة عمل التصوير الفوتوغرافي المناسبة تمامًا لتحرير الصور ، يتم أيضًا تبسيط مساحة عمل الرسم لمهمة محددة. في هذه الحالة ، إنها لوحة رقمية. على الرسم البياني لوحة، سابقا في الجزء العلوي من العمود الرئيسي في مساحة العمل التصوير الفوتوغرافي، تم استبدال مع الحوامل لوحة. تحته ، تم تبديل لوحات Libraries و Adjustments للوحة Brush Presets . لا يزال العمود الضيق الموجود على اليسار يحمل لوحة History ولوحة Clone Source . ولكن تطبيقات ، خصائص و معلوماتتم استبدال اللوحات من مساحة عمل Photography بلوحتي Brush و Tool Presets . في المكتبات لوحة، سابقا في العمود الأوسط، لم تختف تماما. بدلاً من ذلك ، تم نقله من العمود الأوسط إلى العمود الأيسر حيث يشغل الآن مساحة أقل:

استعادة مساحة العمل الافتراضية
للرجوع إلى مساحة العمل الافتراضية في Photoshop ، انتقل إلى قائمة Window ، واختر Workspace ، ثم اختر Essentials . أو انقر على أيقونة مساحة العمل أعلى اللوحات واختر الأساسيات من القائمة:

والآن عدنا إلى تخطيط اللوحة الافتراضي:
تخصيص تخطيط اللوحة
دعنا نجري بعض التغييرات السريعة على تخطيط اللوحة الافتراضي في Photoshop. عندما ننتهي ، سنتعلم كيفية حفظ التخطيط الجديد كمساحة عمل مخصصة. لقد غطيت تحريك اللوحات وترتيبها في البرنامج التعليمي Managing Panels ، لذلك سأمر على هذا بسرعة.
تحريك لوحة
أولاً ، دعنا ننتقل إلى إحدى اللوحات الموجودة. سأجمع لوحة Libraries في لوحات Layers و Channels و Paths. للقيام بذلك ، سأضغط على علامة التبويب المكتبات في أعلى العمود على اليمين. بعد ذلك ، مع استمرار الضغط على زر الماوس ، سأقوم بسحب علامة تبويب المكتبات إلى مجموعة لوحة الطبقات والقنوات والمسارات في أسفل العمود الأوسط. عندما يظهر مربع التمييز الأزرق حول المجموعة ، سأحرر زر الماوس لإسقاط لوحة Libraries في مكانها:
فتح لوحة جديدة
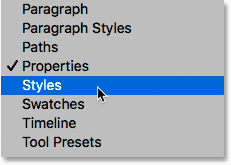
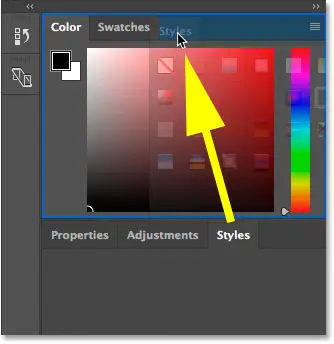
بعد ذلك ، دعنا نضيف لوحة غير مفتوحة بالفعل على الشاشة. سأفتح لوحة الأنماط بالانتقال إلى قائمة النافذة في شريط القائمة واختيار الأنماط :
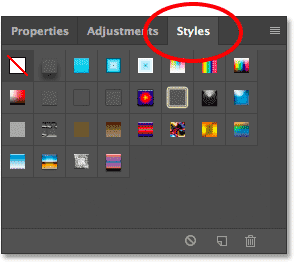
بشكل افتراضي ، يجمع Photoshop لوحة Styles في لوحتي Properties و Adjustments في العمود الأوسط:
أفضل تجميع لوحة Styles مع لوحتي Color و Swatches. لذلك ، سأقوم بتحريك لوحة Styles بالنقر فوق علامة التبويب الخاصة بها وسحبها لأعلى في مجموعة Color and Swatches الموجودة فوقها. عندما يظهر مربع التمييز الأزرق حول المجموعة ، سأحرر زر الماوس لإسقاط لوحة الأنماط في منزلها الجديد:
إغلاق لوحة
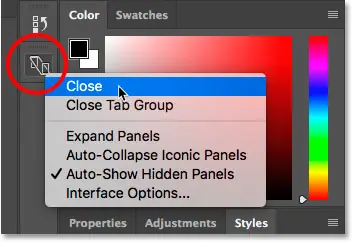
أخيرًا ، دعنا نغلق إحدى اللوحات. ل معاينة الأجهزة وانهار الفريق في العمود الأيسر إلى الرمز الخاص به. ولكن على الرغم من أنها لا تشغل مساحة كبيرة ، فأنا لا أحتاجها حقًا على الشاشة. لإغلاق اللوحة ، سوف أنقر بزر الماوس الأيمن (Win) / انقر مع الضغط على Control (Mac) مباشرة على أيقونة اللوحة. بعد ذلك ، سأختار إغلاق من القائمة:
بعد إجراء التغييرات ، يتبقى لدي تخطيط لوحة مخصص. قبل المتابعة ، ضع في اعتبارك أننا أجرينا هذه التغييرات على مساحة عمل Essentials الافتراضية في Photoshop. سبب أهمية تذكر ذلك سيتضح في غضون لحظات قليلة:
حفظ مساحة عمل جديدة
لحفظ التخطيط المخصص الخاص بك كمساحة عمل جديدة ، انتقل إلى قائمة Window ، واختر Workspace ، ثم اختر New Workspace . أو انقر على أيقونة مساحة العمل واختر مساحة عمل جديدة :

في مربع الحوار New Workspace ، قم بتسمية مساحة العمل المخصصة الخاصة بك. سأطلق على اسمي “مساحة عمل ستيف”. ما لم يكن اسمك هو ستيف ، فقد ترغب في اختيار شيء مختلف. توجد في الجزء السفلي من مربع الحوار خيارات لتضمين اختصارات لوحة المفاتيح المخصصة والقوائم ، بالإضافة إلى تخطيط مخصص لشريط الأدوات. لم ننشئ أيًا من هؤلاء ، لذا اتركهم دون رادع. أخيرًا ، لحفظ مساحة العمل الجديدة ، انقر فوق حفظ :

مع حفظ مساحة العمل ، سأضغط على أيقونة مساحة العمل مرة أخرى لإحضار قائمة مساحات العمل الخاصة بي. وهنا ، نرى مساحة العمل الجديدة الخاصة بي في أعلى القائمة ، وجاهزة للاختيار في أي وقت أحتاج إليه:

تحديث مساحة عمل مخصصة
إذا قمت بإجراء المزيد من التغييرات على تخطيط اللوحة ، يمكنك حفظ التغييرات عن طريق تحديث مساحة العمل. لن تجد خيار “تحديث مساحة العمل” الفعلي في أي مكان. بدلاً من ذلك ، فإن خطوات تحديث مساحة العمل هي نفس خطوات حفظ مساحة العمل. نقوم فقط بحفظه باستخدام نفس الاسم كما كان من قبل. انتقل إلى قائمة Window ، واختر Workspace ، ثم اختر New Workspace . أو انقر على أيقونة مساحة العمل واختر مساحة عمل جديدة . في مربع الحوار New Workspace ، أدخل الاسم نفسه تمامًا مثل مساحة العمل الحالية. في حالتي ، ستكون “مساحة عمل ستيف”. ثم انقر فوق ” حفظ” . سيعيد Photoshop حفظ مساحة العمل بتغييراتك.
إعادة تعيين مساحة العمل الافتراضية
في وقت سابق ، علمنا أنه للعودة إلى مساحة العمل الافتراضية في Photoshop ، فإننا ببساطة نختار Essentials من القائمة:

لكن لاحظ أنه حتى بعد تحديد مساحة عمل Essentials ، لم يتغير تخطيط لوحتي. بدلاً من رؤية التخطيط الافتراضي ، ما زلت أرى تخطيطي المخصص:
لماذا ما زلنا نرى التخطيط المخصص؟ حسنًا ، إذا تذكرت مرة أخرى عندما أنشأنا تخطيطنا المخصص ، فقلت أن نضع في اعتبارنا أننا أنشأناه من خلال إجراء تغييرات على مساحة عمل Essentials. تكمن المشكلة هنا في أن تخطيطات اللوحة “مثبتة”. هذا يعني أن Photoshop يتذكر التغييرات التي أجريناها على التخطيط. كما أنها تحافظ على هذه التغييرات نشطة حتى نطلب منها على وجه التحديد العودة إلى التخطيط الافتراضي. لذلك ، نظرًا لأننا أجرينا تغييرات على مساحة عمل Essentials ، فلا يكفي أن نختارها مرة أخرى. للعودة إلى تخطيط اللوحة الافتراضي ، نحتاج إلى إعادة تعيين مساحة العمل.
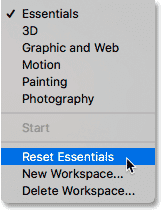
لإعادة تعيين مساحة عمل Essentials ، تأكد أولاً من تحديدها كمساحة عمل نشطة (وهو ما فعلناه بالفعل). بعد ذلك ، انتقل إلى قائمة Window واختر Workspace ، أو انقر على أيقونة Workspace أعلى اللوحات ، واختر Reset Essentials من القائمة:
والآن ، بعد إعادة تعيين مساحة عمل Essentials ، عدنا إلى تخطيط اللوحة الافتراضي الأصلي في Photoshop:
حذف مساحة عمل مخصصة
أخيرًا ، دعنا نتعلم كيفية حذف مساحة عمل مخصصة. سأحذف “Steve’s workspace”. ولكن قبل القيام بذلك ، من المهم أن تعرف أن Photoshop لن يسمح لك بحذف مساحة العمل النشطة حاليًا. لذلك أولاً ، ستحتاج إلى اختيار أي مساحة عمل أخرى من القائمة لتنشيطها. في هذه الحالة ، عدنا بالفعل إلى مساحة عمل Essentials ، لذلك نحن بخير. لحذف مساحة العمل المخصصة الخاصة بك ، ارجع إلى قائمة Workspace ، إما بالانتقال إلى Window > Workspace أو بالنقر فوق أيقونة Workspace ، واختيار Delete Workspace :

في مربع الحوار Delete Workspace ، اختر مساحة العمل التي تريد حذفها. سأختار “مساحة عمل ستيف”. ثم انقر فوق حذف :

سيسألك Photoshop عما إذا كنت متأكدًا من رغبتك في حذف مساحة العمل. انقر فوق نعم :

الآن بعد أن قمت بحذف مساحة العمل المخصصة الخاصة بي ، إذا نظرنا مرة أخرى إلى قائمة مساحة العمل الخاصة بي ، فإننا نرى أن “مساحة عمل Steve” لم تعد موجودة في القائمة:


