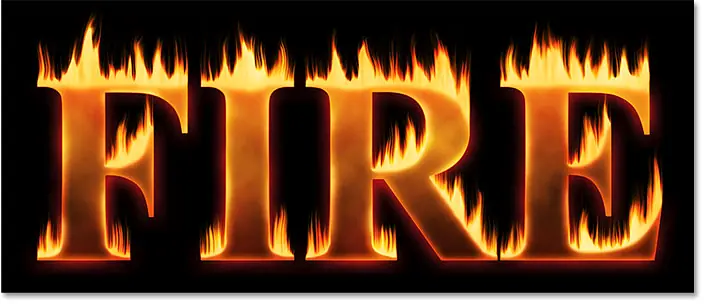


كيفيه عمل نص بالنار بالفوتوشوب
جدول المحتويات
- 1 كيفيه عمل نص بالنار بالفوتوشوب
- 1.1
- 1.2 الجزء الأول: إضافة النص
- 1.3 الجزء 2: رسم ألسنة اللهب حول النص
- 1.3.1 الخطوة 5: تنقيط النوع
- 1.3.2 الخطوة 6: قم بتكرار طبقة النص
- 1.3.3 الخطوة 7: قم بإيقاف تشغيل النسخة
- 1.3.4 الخطوة 8: حدد طبقة النص الأصلية
- 1.3.5 الخطوة 9: قم بتدوير النص 90 درجة في اتجاه عقارب الساعة
- 1.3.6 الخطوة 10: قم بتطبيق مرشح Wind
- 1.3.7 الخطوة 14: قم بتكرار طبقة الخلفية
- 1.3.8 الخطوة 15: دمج طبقات النص والخلفية
- 1.3.9 الخطوة 16: إعادة تسمية الطبقة المدمجة “Flames”
- 1.3.10 الخطوة 17: ارسم اللهب باستخدام مرشح Liquify
- 1.4 الجزء 3: تلوين النيران
- 1.5 الجزء 4: تلوين النص
- 1.6 الجزء الخامس: مزج النص مع اللهب
- 1.7 الجزء 6: إضافة نسيج للتأثير
- 1.7.1 الخطوة 31: أضف طبقة جديدة
- 1.7.2 الخطوة 32: تطبيق مرشح السحب
- 1.7.3 الخطوة 33: أضف طبقة جديدة أخرى
- 1.7.4 الخطوة 34: تطبيق مرشح الألياف
- 1.7.5 الخطوة 35: طمس النسيج باستخدام Gaussian Blur
- 1.7.6 الخطوة 36: قم بتغيير وضع المزج إلى Soft Light
- 1.7.7 الخطوة 37: أضف قناع طبقة مملوءة باللون الأسود
- 1.7.8 الخطوة 38: قم بطلاء النسيج في اللهب
الجزء الأول: إضافة النص
سنبدأ بإنشاء مستند جديد وإضافة النص الأولي.
الخطوة 1: قم بإنشاء مستند Photoshop جديد
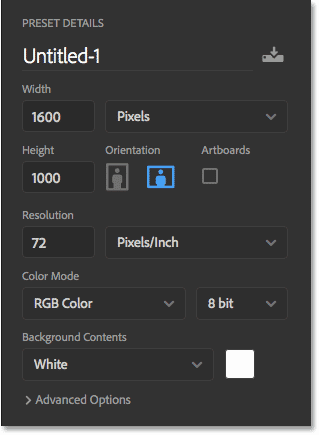
ابدأ بإنشاء مستند Photoshop جديد. اصعد إلى قائمة ” ملف ” في شريط القوائم واختر ” جديد” :
بالنسبة لهذا البرنامج التعليمي ، اضبط عرض المستند على 1600 بكسل ، والارتفاع إلى 1000 بكسل ، والدقة على 72 بكسل / بوصة . اترك محتويات الخلفية مضبوطة على الأبيض في الوقت الحالي. ثم لإنشاء المستند ، انقر فوق إنشاء أو موافق بناءً على إصدار Photoshop الذي تستخدمه:
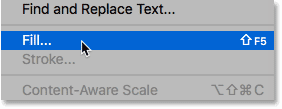
الخطوة 2: املأ المستند الجديد باللون الأسود
قم بتغيير خلفية المستند من الأبيض إلى الأسود بالذهاب إلى قائمة التحرير واختيار Fill :
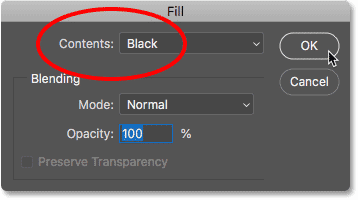
في مربع الحوار Fill ، اضبط Contents على Black ، ثم انقر فوق OK:
يملأ Photoshop الخلفية باللون الأسود:

الخطوة 3: أضف النص الخاص بك
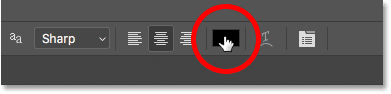
لإضافة النص ، احصل على أداة الكتابة من شريط الأدوات:
إقرأ أيضا:إنشاء تأثير نص الظل الطويل باستخدام Photoshop
في شريط الخيارات ، اختر الخط الخاص بك. سأختار شيئًا بسيطًا مثل Times New Roman Bold . اضبط حجم النوع على 72 نقطة فقط لتعطينا أكبر حجم مضبوط مسبقًا في الوقت الحالي:

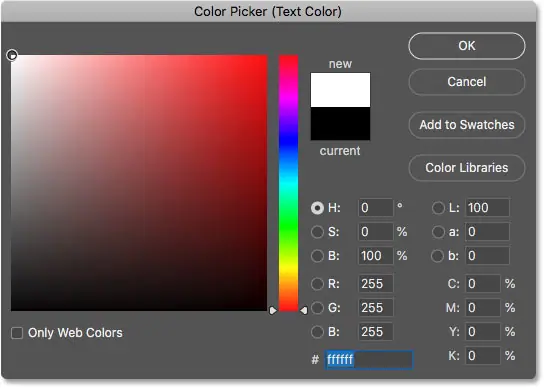
لا يزال في شريط الخيارات ، اضبط لون الكتابة على الأبيض بالنقر فوق حامل اللون :
ثم اختيار اللون الأبيض في Color Picker. انقر فوق “موافق” لإغلاقه:
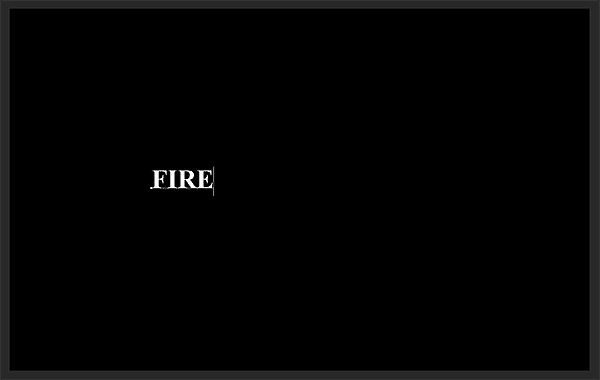
مع اختيار الخط ولون الكتابة ، انقر داخل المستند وأضف النص. سأكتب كلمة “FIRE”. سيبدو النص صغيرًا جدًا ولكننا سنصلح ذلك بعد ذلك:
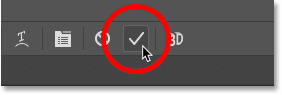
لقبولها ، انقر فوق علامة الاختيار في شريط الخيارات:
الخطوة 4: قم بتغيير حجم النص ونقله باستخدام التحويل الحر
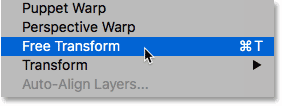
لتغيير حجم النص ، انتقل إلى قائمة ” تحرير ” واختر التحويل الحر :
ثم اضغط مع الاستمرار على مفتاح Shift واسحب أي من مقابض الزاوية للخارج. يؤدي الضغط على مفتاح Shift إلى تأمين أشكال الحروف في مكانها حتى لا تشوهها. عند الانتهاء ، حرر زر الماوس ، ثم حرر مفتاح Shift:
إقرأ أيضا:كيفية إنشاء نص ذهبي في برنامج فوتوشوب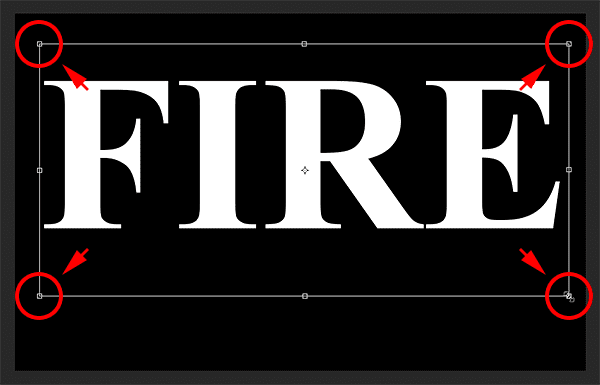
لتحريك النص ، انقر داخل مربع التحويل الحر واسحبه إلى مكانه. إفساح المجال لألسنة اللهب على طول الجزء العلوي من الأحرف عن طريق سحب النص لأسفل إلى النصف السفلي من المستند:
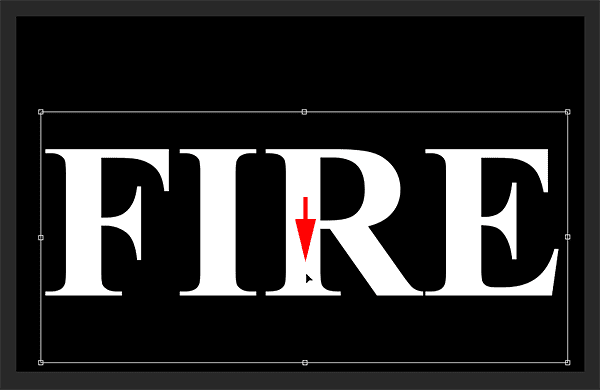
لقبولها ، انقر مرة أخرى على علامة الاختيار في شريط الخيارات:
الجزء 2: رسم ألسنة اللهب حول النص
الخطوة 5: تنقيط النوع
في لوحة Layers ، نرى نصنا على طبقة Type أعلى طبقة Background:
قم بتحويل النص إلى بكسل عن طريق النقر بزر الماوس الأيمن (Win) / النقر مع الضغط على Control (Mac) على طبقة Type واختيار Rasterize Type من القائمة:
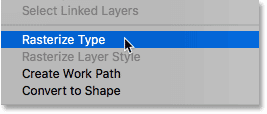
يحول Photoshop النص إلى طبقة عادية:
الخطوة 6: قم بتكرار طبقة النص
قم بعمل نسخة من الطبقة عن طريق سحبها لأسفل على أيقونة طبقة جديدة في أسفل لوحة الطبقات:
إقرأ أيضا:كيفية وضع صور متعددة في النص باستخدام برنامج فوتوشوب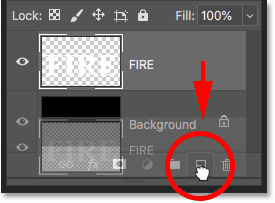
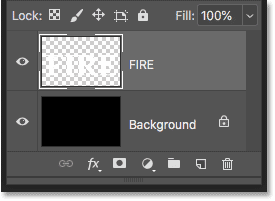
الخطوة 7: قم بإيقاف تشغيل النسخة
تظهر نسخة فوق الأصل. قم بإيقاف تشغيل النسخة الآن بالنقر فوق رمز الرؤية الخاص بها :
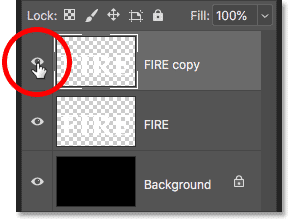
الخطوة 8: حدد طبقة النص الأصلية
ثم انقر فوق طبقة النص الأصلية لتحديدها:

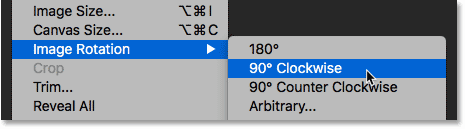
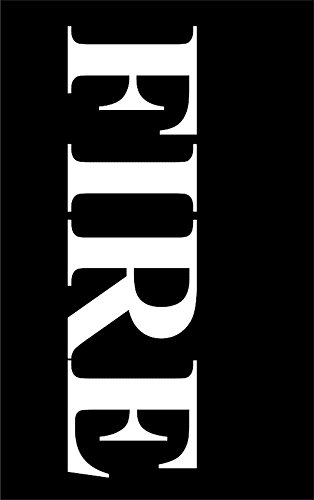
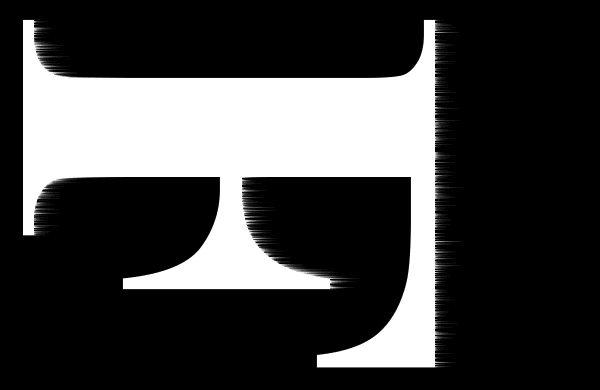
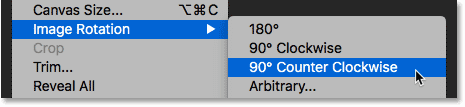
الخطوة 9: قم بتدوير النص 90 درجة في اتجاه عقارب الساعة
نحن جاهزون لإنشاء ألسنة اللهب الخاصة بنا ، وسنبدأ بتطبيق مرشح الرياح في Photoshop. المشكلة هي أن فلتر الرياح يعمل فقط من اليسار إلى اليمين ، أو من اليمين إلى اليسار. إنه لا يعمل عموديًا ، ونريد أن تبدو ألسنتنا وكأنها ترتفع فوق الحروف. لذا ، قبل أن نطبق الفلتر ، نحتاج أولاً إلى تدوير النص. اصعد إلى قائمة الصورة ، واختر تدوير الصورة ، ثم اختر 90 درجة في اتجاه عقارب الساعة :
يؤدي هذا إلى تدوير المستند بأكمله ، بما في ذلك النص ، على جانبه:
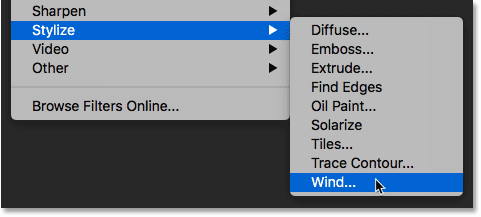
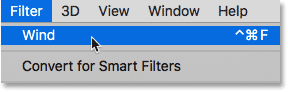
الخطوة 10: قم بتطبيق مرشح Wind
مع تدوير النص ، انتقل إلى قائمة التصفية ، واختر Stylize ، ثم اختر Wind :
في مربع الحوار Wind ، اضبط Method to Wind and the Direction على From the Left ، ثم انقر فوق OK:
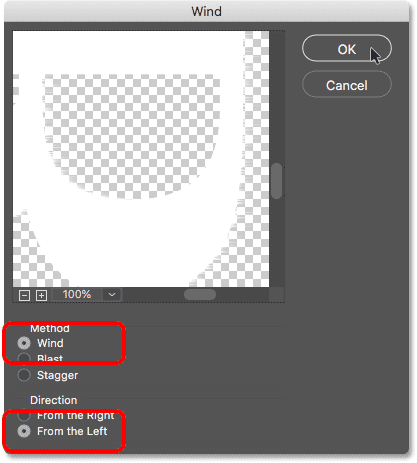
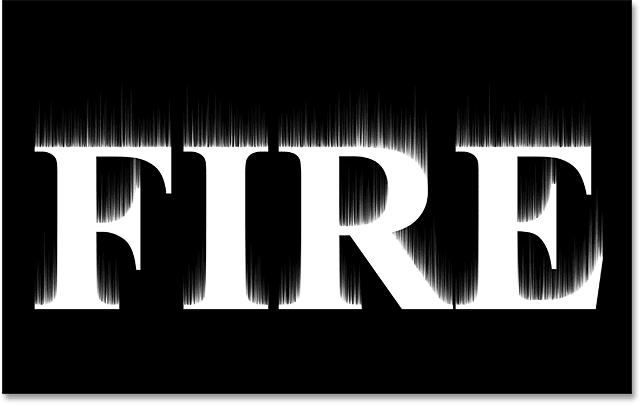
إذا نظرت عن كثب ، سترى خطوطًا صغيرة أو أشواك تمتد للخارج على طول الحواف اليمنى لكل حرف. لقد قمت هنا بتكبير الحرف F لتسهيل رؤيته:
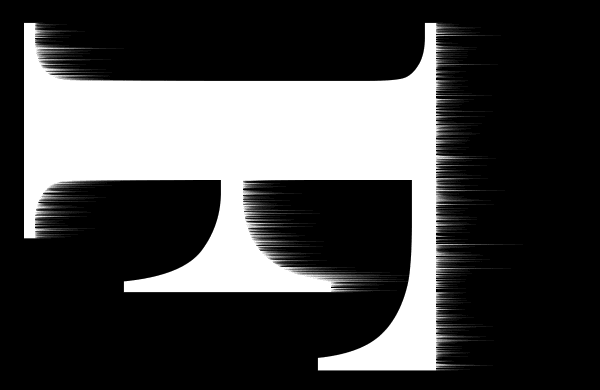
الخطوة 11: أعد تطبيق مرشح الرياح مرتين أخريين
لجعل الخطوط أطول ، قم بتطبيق مرشح الرياح مرة أخرى. ارجع إلى قائمة التصفية ، ولأن Wind كان آخر مرشح طبقناه ، ستجده في أعلى القائمة:
بعد تشغيله مرة ثانية ، تصبح الخطوط أكثر وضوحًا:
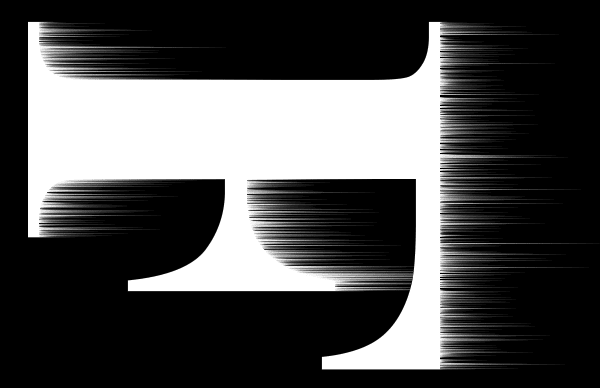
قم بتطبيق مرشح Wind مرة ثالثة باختياره مرة أخرى من أعلى قائمة Filter:
والآن أصبحت الخطوط ما دامت بحاجة:
الخطوة 12: قم بتدوير النص 90 درجة عكس اتجاه عقارب الساعة
نحن القيام به مع فلتر الرياح، لذلك تدوير الظهر النص إلى اتجاه الأصلي الخاص به عن طريق الذهاب حتى صورة القائمة، واختيار صورة دوران ، وهذه المرة، واختيار 90 درجة عكس عقارب الساعة :
مع تدوير النص ، ترتفع الخطوط الآن لأعلى نحو الأعلى:
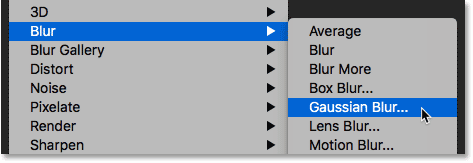
الخطوة 13: تطبيق مرشح Gaussian Blur
لتنعيم الخطوط ، قم بتطبيق بعض التمويه. اصعد إلى قائمة التصفية ، واختر Blur ، ثم اختر Gaussian Blur :
في مربع الحوار Gaussian Blur ، اختر قيمة نصف قطر منخفضة تبلغ حوالي 1 بكسل ، ثم انقر فوق OK:
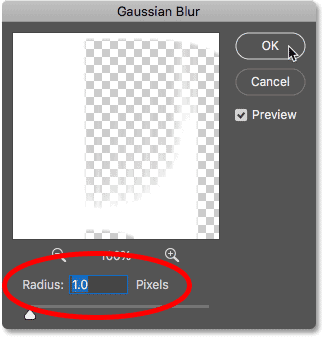
تبدو الخطوط الآن أكثر نعومة لهم:

الخطوة 14: قم بتكرار طبقة الخلفية
مرة أخرى في لوحة Layers ، قم بعمل نسخة من طبقة الخلفية عن طريق سحبها لأسفل إلى أيقونة New Layer :
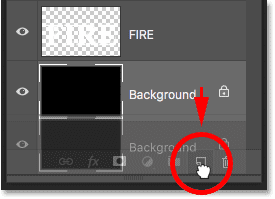
تظهر نسخة فوق الأصل:
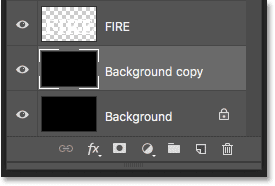
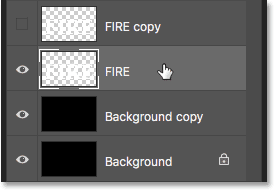
الخطوة 15: دمج طبقات النص والخلفية
ادمج طبقة النص مع طبقة “نسخة الخلفية” بالنقر فوق طبقة النص لتحديدها:
ثم النقر بزر الماوس الأيمن (Win) / النقر مع الضغط على Control (Mac) على الطبقة واختيار Merge Down من القائمة:
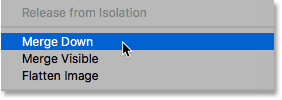
يؤدي هذا إلى دمج كلتا الطبقتين في طبقة واحدة:
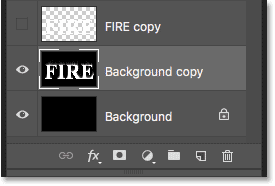
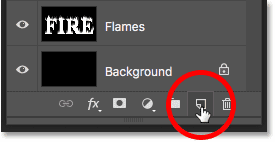
الخطوة 16: إعادة تسمية الطبقة المدمجة “Flames”
انقر نقرًا مزدوجًا فوق الاسم “Background copy” لتمييزه ، ثم أعد تسمية الطبقة “Flames”. اضغط على Enter (Win) / Return (Mac) لقبوله:
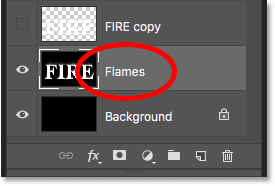
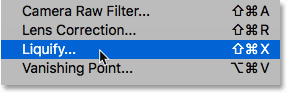
الخطوة 17: ارسم اللهب باستخدام مرشح Liquify
مع تحديد طبقة “Flames” ، انتقل إلى قائمة Filter واختر Liquify :
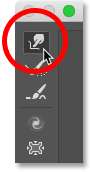
حدد أداة Forward Warp
في مربع الحوار Liquify filter ، تأكد من تحديد Forward Warp Tool في شريط الأدوات على طول اليسار:
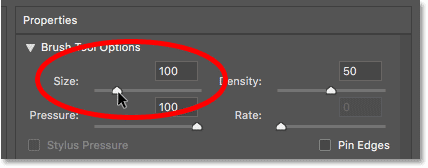
اضبط حجم الفرشاة
بعد ذلك ، في خيارات أداة الفرشاة على اليمين ، اضبط حجم الفرشاة على حوالي 100 بكسل :
اعوجي الخطوط
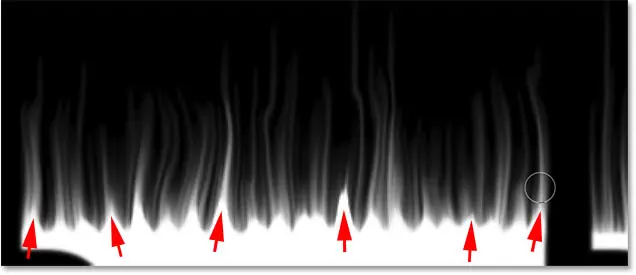
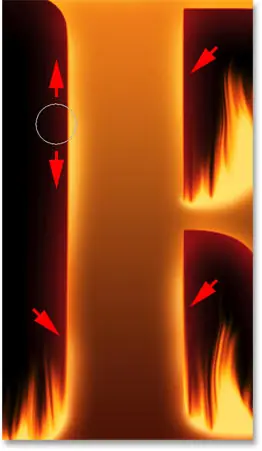
أول شيء يتعين علينا القيام به هو إعطاء الخطوط التي أنشأناها باستخدام مرشح الرياح مظهرًا أكثر نعومة . انقر داخل الخطوط في أماكن مختلفة واسحب الماوس لمسافة قصيرة ، إما يسارًا أو يمينًا ، لتشويهها بلطف وإنشاء منحنيات دقيقة وعشوائية. فقط انقر واسحب وحرر زر الماوس ثم انقر واسحب مرة أخرى في منطقة مختلفة. حاول ألا تنقر داخل الأحرف نفسها في الوقت الحالي. فقط قم بلف وتذبذب الخطوط:

إصلاح الأخطاء باستخدام أداة Reconstruct Tool
إذا ارتكبت خطأً ، فتراجع عن خطوتك الأخيرة بالضغط على Ctrl + Z (Win) / Command + Z (Mac). أو حدد أداة Reconstruct Tool من شريط الأدوات ثم قم بالطلاء فوق المنطقة للتراجع عن الالتواء الذي تم تطبيقه. بمجرد أن تتخلص من الخطأ ، عد إلى أداة Forward Warp Tool واستمر في تزييف الخطوط:

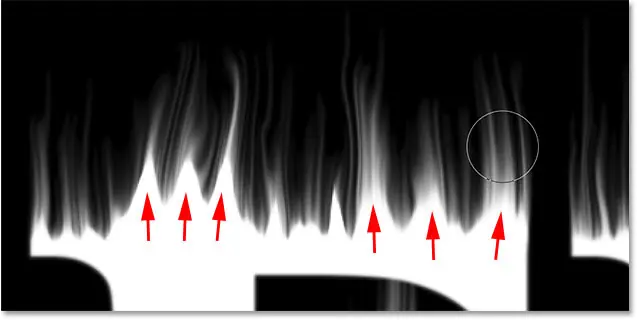
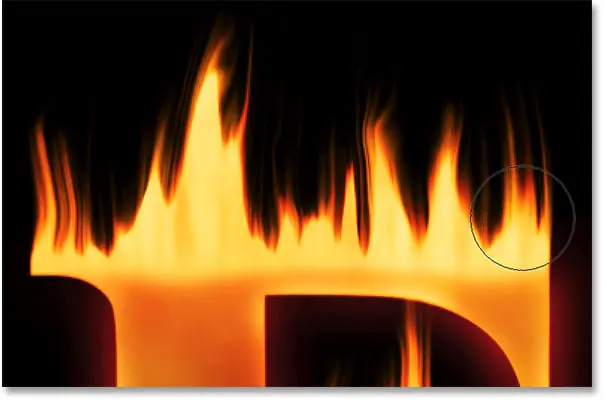
لا تنس تضمين الخطوط في القسمين الأوسط والسفلي من الأحرف. إذا كنت بحاجة إلى ضبط حجم الفرشاة ، فاضغط على مفتاحي القوس الأيمن والأيسر على لوحة المفاتيح. القوس الأيسر ([) يجعل الفرشاة أصغر والقوس الأيمن (]) يجعله أكبر. عندما تنتهي ، يجب أن ينتهي بك الأمر بشيء مشابه لما لدي هنا:

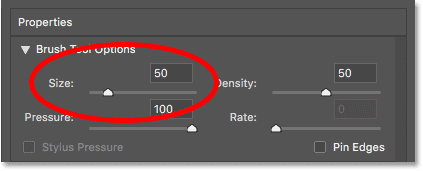
اخفض حجم الفرشاة وارسم لهبًا صغيرًا
مرة أخرى في خيارات أداة الفرشاة ، قم بتخفيض حجم الفرشاة إلى حوالي 20 بكسل :
![]()
هذه المرة ، لإنشاء ألسنة اللهب الصغيرة ، انقر داخل الأحرف واسحب لأعلى في الخطوط. حاول السحب في اتجاهات مختلفة للتنوع ، أو حتى اتبع مسار الخطوط للحصول على تأثير إضافي:
مرة أخرى إذا قمت بخطأ ما ، فاضغط على Ctrl + Z (Win) / Command + Z (Mac) للتراجع عن خطوتك الأخيرة. عندما تنتهي من الجزء العلوي من الأحرف ، افعل نفس الشيء مع الأقسام السفلية والمتوسطة. يجب أن تبدو النتيجة كما يلي:
قم بزيادة حجم الفرشاة وارسم لهبًا أكبر
قم بزيادة حجم الفرشاة إلى حوالي 50 بكسل :
ثم انقر فوق النقاط العشوائية داخل الأحرف واسحب لأعلى لإنشاء ألسنة اللهب أكبر. مرة أخرى اسحب في اتجاهات مختلفة للتنوع:
ها هي نتيجتي بعد إضافة اللهب الأكبر:
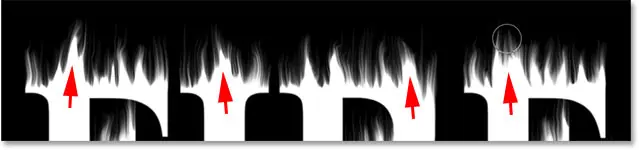
قم بزيادة حجم الفرشاة وارسم أكبر اللهب
أخيرًا ، قم بزيادة حجم الفرشاة إلى حوالي 70 بكسل :
![]()
ثم انقر واسحب لإضافة عدد قليل من ألسنة اللهب الأكبر على طول القمم. واحد لكل حرف يجب أن يفعل ذلك:
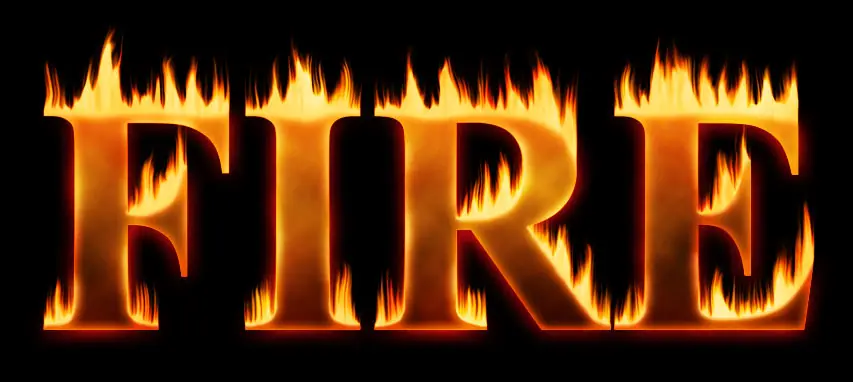
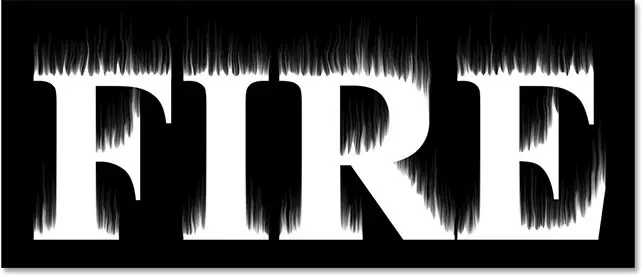
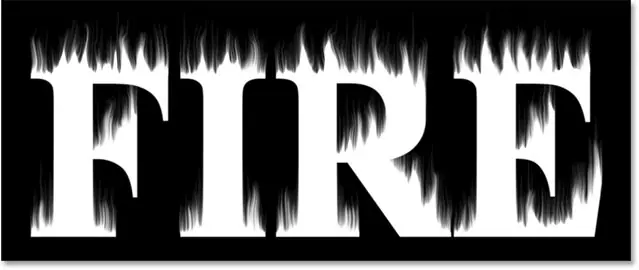
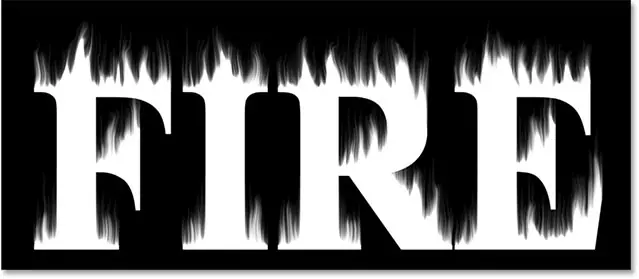
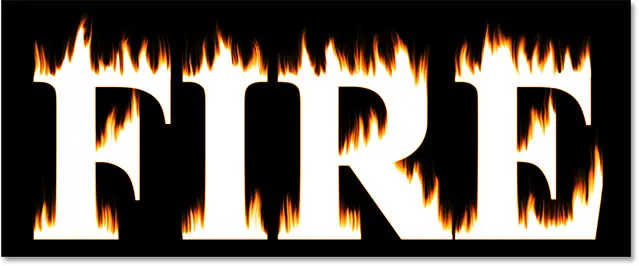
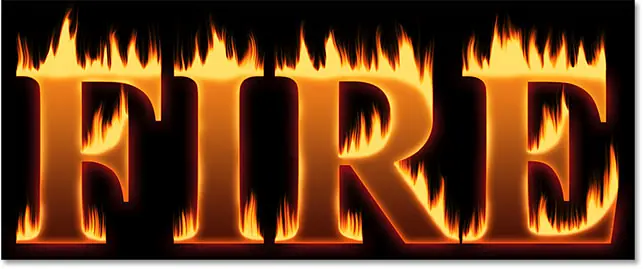
عند الانتهاء ، انقر فوق “موافق” لإغلاق مرشح Liquify ، وإليك نتيجتي:
الجزء 3: تلوين النيران
الخطوة 18: أضف طبقتين لضبط Hue / Saturation
في الوقت الحالي ، ألسنة اللهب بيضاء فقط ، لذا دعونا نضيف بعض الألوان إليها.
أضف طبقة ضبط Hue / Saturation الأولى
في لوحة Layers ، انقر فوق أيقونة New Fill أو Adjustment Layer في الأسفل:
![]()
ثم اختر Hue / Saturation من القائمة:
تظهر طبقة الضبط فوق طبقة “Flames” مباشرة:

وتظهر عناصر التحكم والخيارات الخاصة بطبقة الضبط في لوحة خصائص Photoshop . أولاً ، قم بتشغيل خيار Colorize . ثم تعيين هوى القيمة إلى 40 و التشبع إلى 100 :

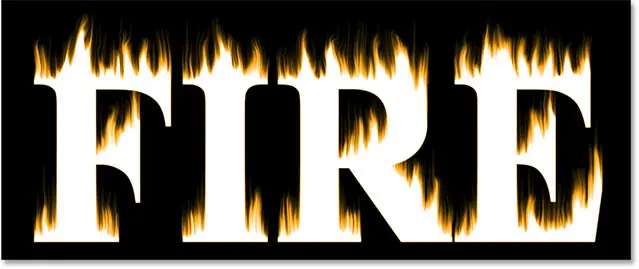
يضيف هذا لونًا أصفر دافئًا إلى قمم اللهب:
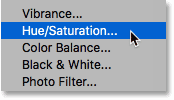
أضف طبقة ضبط صبغة / إشباع ثانية
أضف طبقة ضبط Hue / Saturation ثانية عن طريق النقر مرة أخرى على أيقونة New Fill أو Adjustment Layer في لوحة Layers:
![]()
واختيار Hue / Saturation من القائمة:
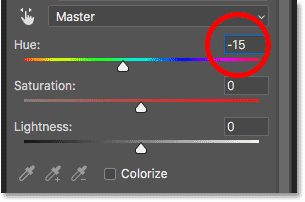
في لوحة Properties ، اترك خيار Colorize غير محدد هذه المرة ، واضبط قيمة Hue على -15 :
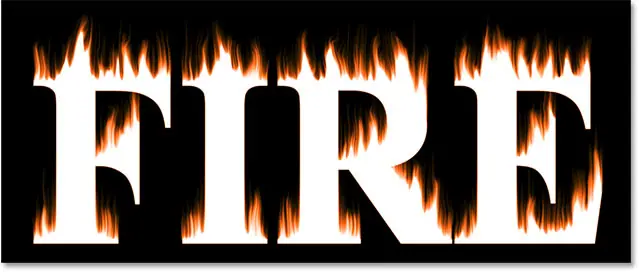
هذا يغير لون اللهب من الأصفر إلى البرتقالي:
الخطوة 19: قم بتغيير وضع المزج إلى Overlay
لمزج الألوان من طبقتين ضبط Hue / Saturation معًا ، قم بتغيير وضع المزج للطبقة الثانية من Normal إلى Overlay :
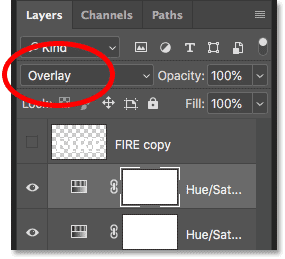
يمزج هذا بين البرتقالي والأصفر معًا:
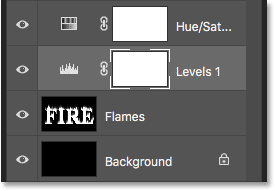
الخطوة 20: قم بإضافة تعديل المستويات فوق طبقة “Flames”
لتغيير المناطق البيضاء المتبقية إلى اللون الأصفر ، حدد طبقة “Flames”:
ثم انقر فوق أيقونة New Fill or Adjustment Layer :
![]()
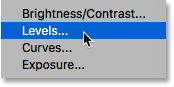
وهذه المرة ، اختر المستويات :
يضيف Photoshop طبقة ضبط Levels مباشرة فوق طبقة “Flames”:
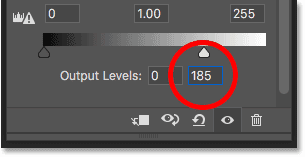
الخطوة 21: قم بخفض مستوى الإخراج الأقصى للسطوع
في لوحة الخصائص ، سترى قيمتين لمستويات الإخراج ؛ مجموعة واحدة على 0 والأخرى إلى 255. تتحكم القيمة الأولى في الحد الأدنى لمستوى السطوع للطبقات الموجودة أسفل طبقة الضبط ، وتتحكم الثانية في الحد الأقصى للسطوع. لتلاشي اللهب والنص من الأبيض إلى الأصفر ، اخفض القيمة الثانية من 255 إلى 185 :
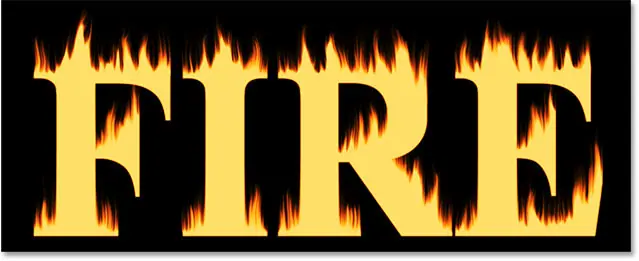
وهذه هي النتيجة. أصبحت المناطق البيضاء صفراء الآن ، ولكن لا تزال الإبرازات البرتقالية على طول قمم اللهب:
الجزء 4: تلوين النص
الآن بعد أن أضفنا بعض الألوان إلى اللهب ، دعنا نلون النص نفسه. وسنفعل ذلك باستخدام تأثيرات طبقة Photoshop.
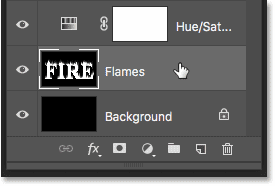
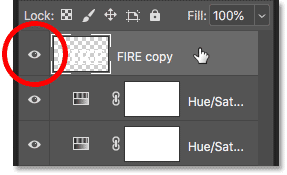
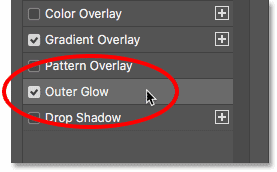
الخطوة 22: حدد الطبقة العليا وقم بتشغيلها
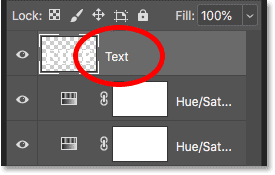
مرة أخرى في لوحة Layers ، انقر فوق الطبقة العليا (طبقة “FIRE copy”) لتحديدها ، ثم قم بتشغيل الطبقة بالنقر فوق أيقونة الرؤية الخاصة بها :
الخطوة 23: أعد تسمية الطبقة
نظرًا لأن هذه هي طبقة النص الرئيسية الخاصة بنا ، انقر نقرًا مزدوجًا فوق اسمها لتمييزها ، ثم أعد تسمية الطبقة “النص”. اضغط على Enter (Win) / Return (Mac) لقبوله:
الخطوة 24: أضف تأثير طبقة تراكب متدرج
مع تحديد طبقة “النص” ، انقر فوق رمز Layer Styles (رمز “fx”) في الجزء السفلي من لوحة Layers:
![]()
ثم اختر Gradient Overlay من القائمة:

إعادة تعيين الإعدادات الافتراضية للتدرج
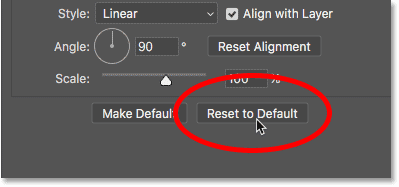
يؤدي هذا إلى فتح مربع حوار Layer Style في Photoshop المعين على خيارات Gradient Overlay. أولاً ، انقر فوق الزر إعادة التعيين إلى الافتراضي للتأكد من أننا نبدأ من الإعدادات الافتراضية:
تحرير التدرج
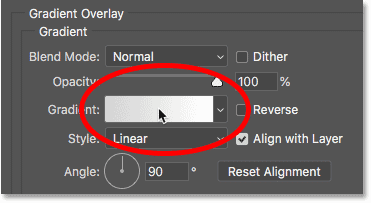
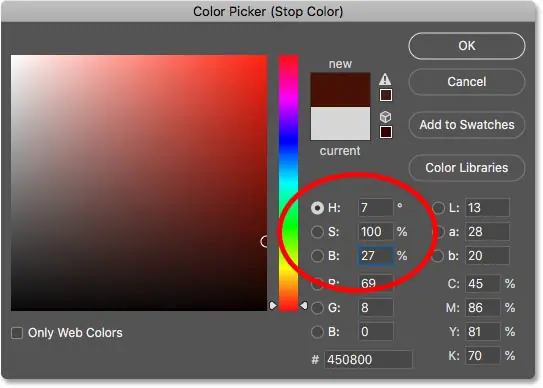
لتحرير التدرج اللوني ، انقر فوق حامل اللون :
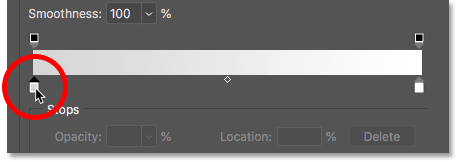
في محرر التدرج اللوني ، انقر نقرًا مزدوجًا فوق توقف اللون أسفل الطرف الأيسر من التدرج اللوني :
ثم ، في Color Picker ، اختر اللون الأحمر الداكن عن طريق ضبط قيمة Hue (H) على 7 ، وقيمة Saturation (S) على 100 و Brightness (B) على 27 . انقر فوق موافق لإغلاق Color Picker:
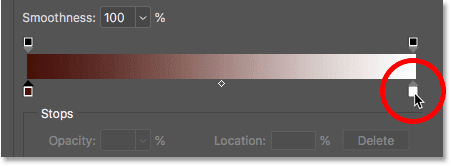
بالعودة إلى محرر التدرجات اللونية ، انقر نقرًا مزدوجًا فوق توقف اللون أسفل الطرف الأيمن من التدرج اللوني :
وفي لاقط اللون، واختيار اللون البرتقالي أكثر إشراقا عن طريق تعيين هوى إلى 30 ، و الإشباع إلى 95 و السطوع إلى 96 :
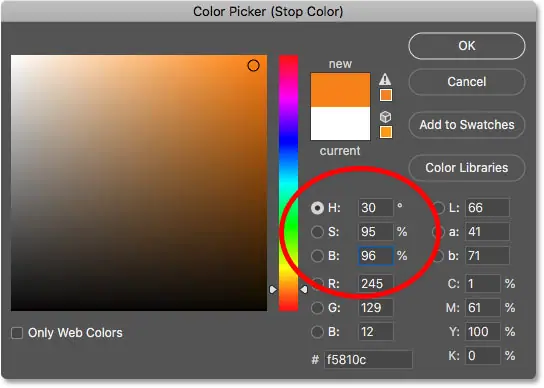
انقر فوق OK لإغلاق Color Picker ، ثم انقر فوق OK لإغلاق Gradient Editor ، لكن اترك مربع الحوار Layer Style مفتوحًا. النص ملون الآن بالتدرج:
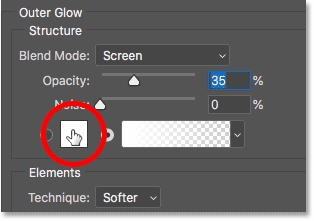
الخطوة 25: أضف نمط طبقة التوهج الخارجي
في شاشة Layer Style ، اختر Outer Glow من قائمة التأثيرات الموجودة على اليسار:
ثم ، في خيارات Outer Glow ، انقر فوق حامل اللون لتغيير لون التوهج:
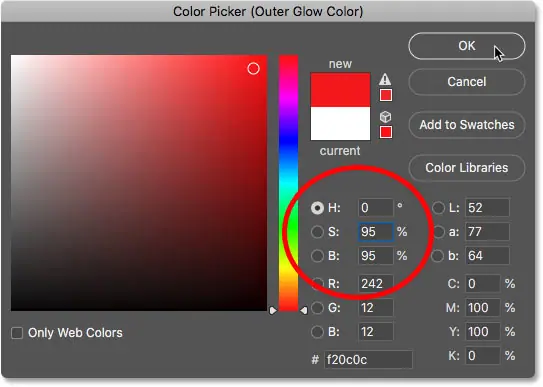
وفي Color Picker ، اختر اللون الأحمر الفاتح. سأقوم بتعيين قيمة Hue على 0 ، والتشبع على 95 ، والسطوع أيضًا على 95 . ثم انقر فوق OK لإغلاق Color Picker:
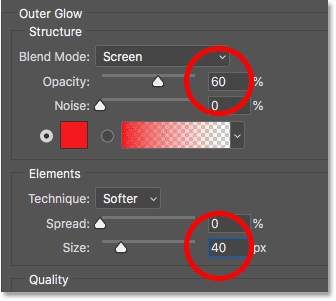
مرة أخرى في خيارات التوهج الخارجي ، اضبط العتامة للتحكم في سطوع التوهج ، والحجم للتحكم في المسافة التي يمتدها التوهج إلى الخارج من النص. أنا مسحت التعتيم إلى 60٪ و الحجم إلى 40 بكسل :
هذا هو التأثير مع التوهج الأحمر المطبق حول الحروف:
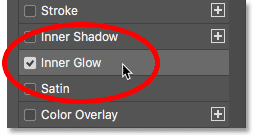
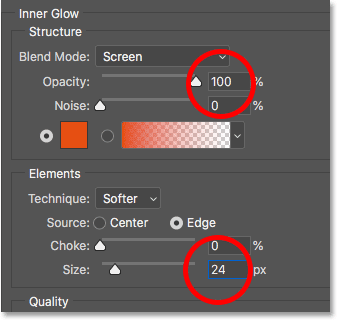
الخطوة 26: أضف توهجًا داخليًا
لا يزال في مربع الحوار Layer Style ، حدد Inner Glow على اليسار:
في خيارات Inner Glow ، انقر فوق حامل اللون :
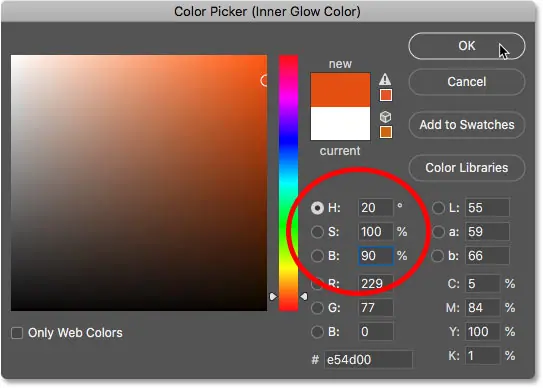
وفي Color Picker ، اختر برتقاليًا ساطعًا. أنا تعيين هوى إلى 20 ، و التشبع إلى 100 و السطوع إلى 90 . انقر فوق “موافق” عندما تنتهي من إغلاق Color Picker:
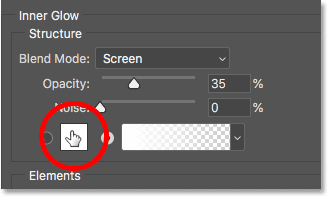
وأخيرًا ، بالعودة إلى خيارات Inner Glow ، قم بزيادة التعتيم على طول الطريق إلى 100٪ ، ثم اضبط الحجم على حوالي 24 بكسل :
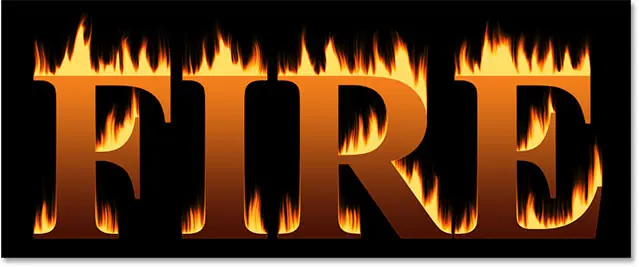
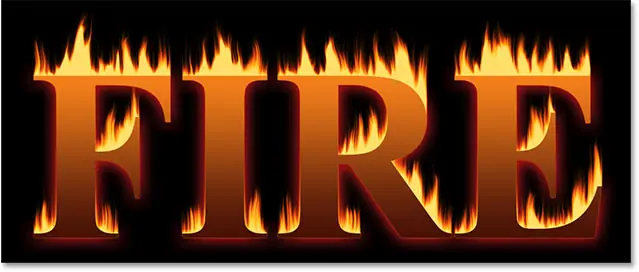
لقد انتهينا من أنماط الطبقة الخاصة بنا ، لذا انقر فوق موافق لإغلاق مربع الحوار Layer Style. إليك النتيجة مع جميع تأثيرات الطبقات الثلاث المطبقة على النص:
الجزء الخامس: مزج النص مع اللهب
في الوقت الحالي ، يبدو النص وكأنه جالس أمام اللهب. سنقوم بدمج النص في اللهب باستخدام قناع طبقة.
الخطوة 27: أضف قناع طبقة إلى طبقة النص
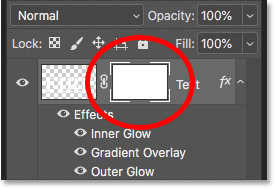
مع استمرار نشاط طبقة “النص” ، انقر فوق رمز Add Layer Mask أسفل لوحة Layers:
تظهر مصغر قناع الطبقة البيضاء بجوار مصغر معاينة الطبقة “النص”:
الخطوة 28: حدد أداة الفرشاة
احصل على أداة الفرشاة من شريط الأدوات:

الخطوة 29: اضبط لون الفرشاة على الأسود
نحتاج إلى الطلاء على قناع الطبقة باللون الأسود ، لذا تأكد من ضبط لون المقدمة (لون الفرشاة) على الأسود :
الخطوة 30: قم بالطلاء على طول حواف الحروف لتندمج مع اللهب
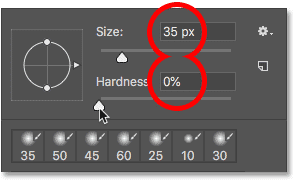
انقر بزر الماوس الأيمن (Win) / انقر مع الضغط على Control (Mac) داخل المستند لإظهار خيارات الفرشاة. ثم قم بتقليل الصلابة إلى 0٪ حتى تقوم بالرسم بفرشاة ناعمة ، واضبط الحجم على ما بين 30-40 بكسل . اضغط على Enter (Win) / Return (Mac) لإغلاق خيارات الفرشاة:
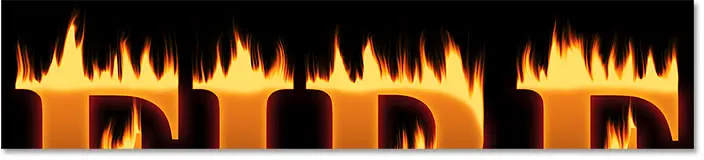
ثم ابدأ بالرسم على طول قمم الحروف. ستختفي الحواف الحادة للنص في ألسنة اللهب. حاول أن ترسم بخط متموج بدلاً من خط مستقيم:

إذا قمت بخطأ ما ، فاضغط على Ctrl + Z (Win) / Command + Z (Mac) للتراجع عنه. ثم استمر في الرسم حتى يبدو الجزء العلوي من كل حرف وكأنه يذوب في النار:
عندما تنتهي من القمم ، افعل نفس الشيء مع الحواف الوسطى والسفلية للحروف ، وقم بالطلاء على طولهم لدمجهم في اللهب. استخدم مفاتيح القوس الأيمن والأيسر على لوحة المفاتيح إذا كنت بحاجة إلى ضبط حجم الفرشاة:
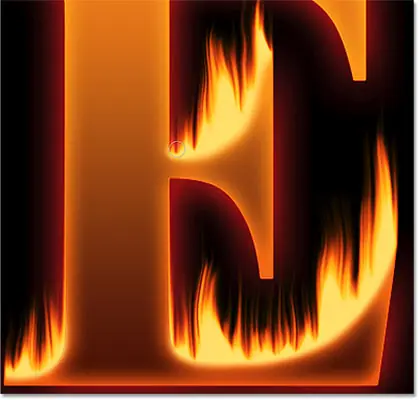
للإضافة إلى التأثير ، استخدم فرشاة أكبر (اضغط على مفتاح القوس الأيمن عدة مرات) وقم بالطلاء على طول الحواف الأخرى للأحرف لإضافة توهج إلى تلك المناطق. احتفظ بمعظم مؤشر الفرشاة خارج الحرف بحيث لا تمر فوقه إلا الحافة الخارجية:
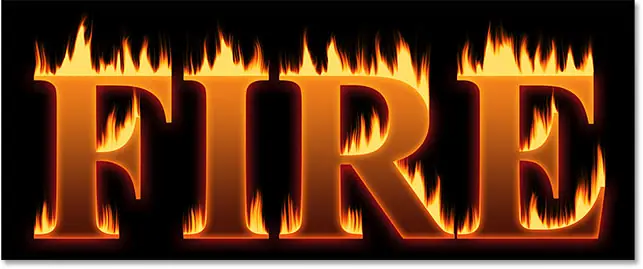
ها هي نتيجتي بعد الطلاء على طول الحواف. نحن على وشك الانتهاء:
الجزء 6: إضافة نسيج للتأثير
دعونا نضيف بعض الملمس ، إلى النص نفسه وإلى اللهب.
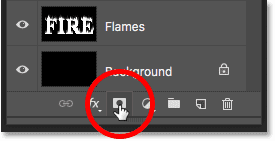
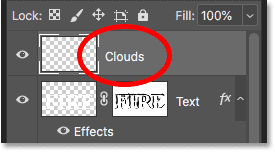
الخطوة 31: أضف طبقة جديدة
مع استمرار نشاط طبقة “النص” ، انقر فوق رمز طبقة جديدة في الجزء السفلي من لوحة الطبقات:
تظهر طبقة فارغة جديدة فوق طبقة “النص”. سنقوم بإنشاء نسيج باستخدام مرشح Clouds في Photoshop ، لذا انقر نقرًا مزدوجًا فوق اسم الطبقة لتمييزها ، ثم أعد تسميتها “Clouds”. اضغط على Enter (Win) / Return (Mac) لقبوله:
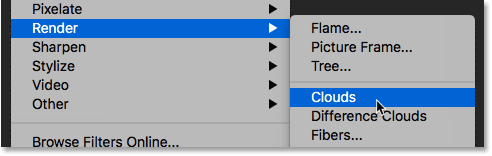
الخطوة 32: تطبيق مرشح السحب
في شريط الأدوات ، تأكد من ضبط ألوان المقدمة والخلفية على الإعدادات الافتراضية (الأسود والأبيض). إذا لم تكن كذلك ، فاضغط على D على لوحة المفاتيح لإعادة تعيينها:
ثم انتقل إلى قائمة Filter واختر Render ثم اختر Clouds :
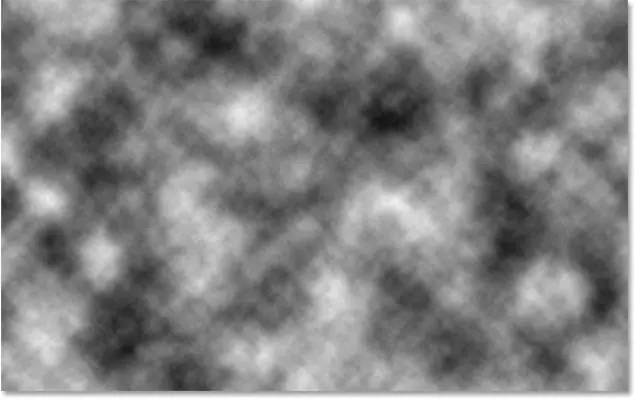
يملأ Photoshop الطبقة بـ “غيوم” عشوائية بالأبيض والأسود ، مما يحظر عرض النص مؤقتًا:
لمزج نسيج السحابة مع النص واللهب ، قم بتغيير وضع المزج لطبقة “الغيوم” من عادي إلى تراكب . ثم اضبط شدة النسيج عن طريق خفض عتامة الطبقة إلى حوالي 70٪ :
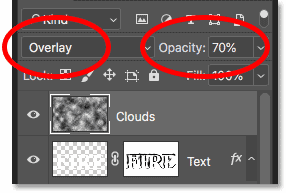
وإليك النتيجة مع إضافة النسيج. غالبًا ما يكون مرئيًا في النص ، ولكن يمكنك أيضًا رؤية الإبرازات والظلال الدقيقة في اللهب:
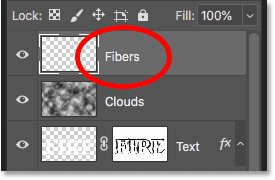
الخطوة 33: أضف طبقة جديدة أخرى
سنضيف نسيجًا آخر ، هذه المرة لتعزيز النيران. انقر مرة أخرى على أيقونة طبقة جديدة في أسفل لوحة الطبقات:
تظهر الطبقة الجديدة فوق طبقة “السحب”. سننشئ هذا النسيج الثاني باستخدام مرشح الألياف في Photoshop ، لذا أعد تسمية هذه الطبقة بـ “الألياف”:
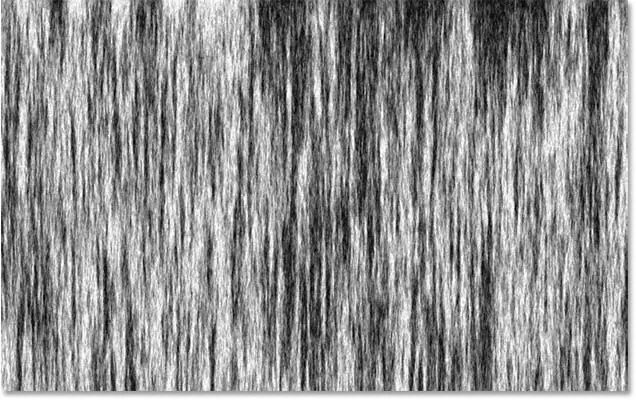
الخطوة 34: تطبيق مرشح الألياف
تأكد من أن ألوان المقدمة والخلفية لا تزال مضبوطة على الأسود والأبيض:
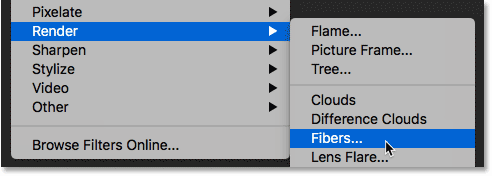
ثم انتقل إلى قائمة Filter واختر Render ثم اختر Fibers :
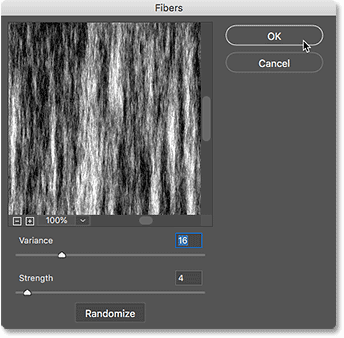
في مربع حوار Fibers ، فقط اقبل الإعدادات الافتراضية وانقر فوق OK:
يملأ Photoshop الطبقة بنمط ألياف عشوائي ، مما يحجب مرة أخرى تأثير النص من العرض:
الخطوة 35: طمس النسيج باستخدام Gaussian Blur
قم بتنعيم النسيج من خلال الانتقال إلى قائمة Filter واختيار Blur ثم اختيار Gaussian Blur :
في شاشة Gaussian Blur ، اضبط قيمة Radius على 2 بكسل ، ثم انقر فوق OK:
![]()
الخطوة 36: قم بتغيير وضع المزج إلى Soft Light
بعد ذلك ، لمزج الألياف مع اللهب ، قم بتغيير وضع المزج لطبقة “الألياف” إلى Soft Light :
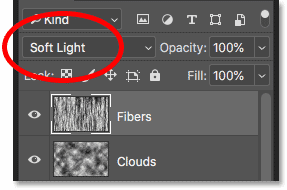
المشكلة هي أن هذا يمزج النسيج ليس فقط مع اللهب ولكن أيضًا مع النص ، والذي لا يبدو صحيحًا:
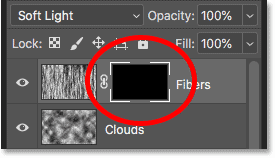
الخطوة 37: أضف قناع طبقة مملوءة باللون الأسود
لإصلاح ذلك ، اضغط مع الاستمرار على مفتاح Alt (Win) / Option (Mac) وانقر فوق أيقونة Add Layer Mask في لوحة Layers:
يؤدي هذا إلى إضافة قناع طبقة إلى طبقة “الألياف” ويملأ القناع باللون الأسود ، مما يخفي النسيج بالكامل من العرض:
الخطوة 38: قم بطلاء النسيج في اللهب
قم بتغيير لون الفرشاة من الأسود إلى الأبيض بالضغط على مفتاح X بلوحة المفاتيح لتبديل ألوان المقدمة والخلفية:
ثم استخدم مفاتيح القوس اليسرى أو اليمنى على لوحة المفاتيح لتغيير حجم الفرشاة حسب الحاجة ، وقم بالطلاء فوق اللهب لإعادة نسيج الألياف:
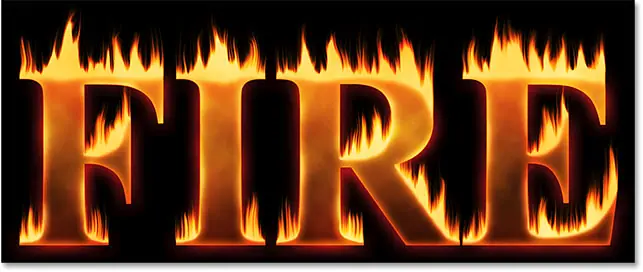
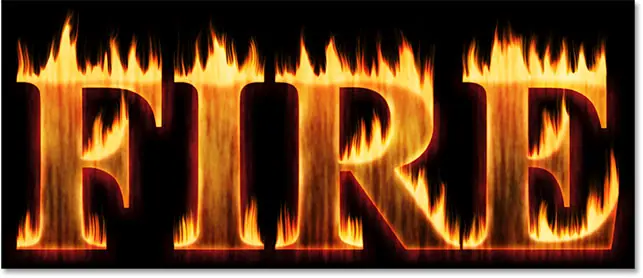
إذا ارتكبت خطأ وقمت بطلاء النص عن طريق الخطأ ، فاضغط على X لتبديل لون الفرشاة من الأبيض إلى الأسود ثم قم بالطلاء فوق الخطأ لإخفائه. ثم اضغط على X مرة أخرى لتبديل لون الفرشاة مرة أخرى إلى اللون الأبيض واستمر في الطلاء فوق اللهب. وهنا ، بعد طلاء النسيج ، تكون النتيجة النهائية لـ “نص النار”: