


كيفية إنشاء نص ملون في برنامج فوتوشوب
جدول المحتويات
- 1 كيفية إنشاء نص ملون في برنامج فوتوشوب
- 1.1 كيفية تطبيق ضربة لون منقسم حول النص
- 1.2 كيفية ملء الخلفية بتدرج لوني منقسم
إعداد المستند
لتوفير الوقت ، قمت بإنشاء مستند Photoshop جديد بخلفية بيضاء ، وقمت بإضافة بعض النص على طبقة كتابة فوقه. الخط الذي أستخدمه هو Avenir Next Heavy لكن أي خط سيعمل. ولا يهم لون النص لأننا سنستبدل اللون بالتدرج اللوني الخاص بنا:

الخطوة 1: أضف تأثير Gradient Overlay إلى النص
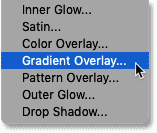
لإضافة تدرج إلى النص ، سنستخدم تأثير طبقة Gradient Overlay.
في لوحة Layers ، تأكد من تحديد طبقة الكتابة . ثم انقر فوق رمز fx في الأسفل:
![]()
واختر Gradient Overlay من القائمة:
الخطوة 2: اختر التدرج اللوني الأسود والأبيض
في مربع الحوار نمط طبقة يفتح إلى خيارات متدرجة التراكب. سنبدأ باختيار التدرج اللوني القياسي من الأسود إلى الأبيض في Photoshop ، ثم سنقوم بتحرير الألوان لإنشاء التدرج اللوني المخصص الخاص بنا:
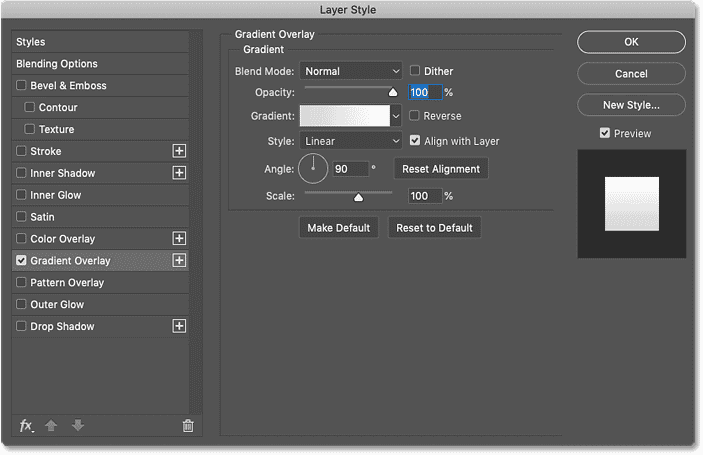
لاختيار التدرج اللوني ، انقر فوق حامل لون التدرج الحالي . تأكد من النقر فوق حامل اللون نفسه ، وليس السهم الصغير على يمين العينة:
إقرأ أيضا:كيفية إنشاء نص ذهبي في برنامج فوتوشوب
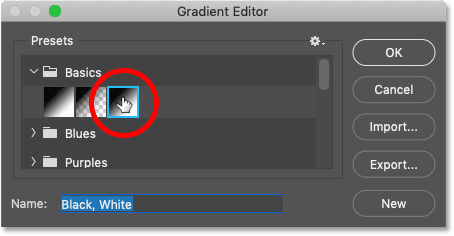
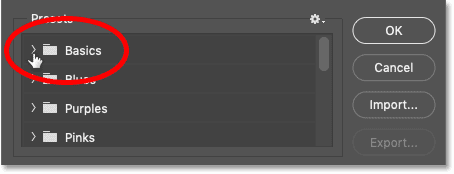
ثم في محرر التدرج ، اختر التدرج اللوني الأسود والأبيض من قسم الإعدادات المسبقة في الأعلى. اعتبارًا من Photoshop CC 2020 ، يتم تجميع الإعدادات المسبقة للتدرج في مجلدات ويتم العثور على التدرج اللوني الأسود والأبيض في مجلد الأساسيات:
الخطوة 3: قم بتحرير ألوان التدرج
يعرض شريط معاينة التدرج الموجود في النصف السفلي من الشاشة ألوان التدرج اللوني الحالية. ومع تحديد التدرج اللوني الأسود والأبيض ، يظهر الجانب الأيسر من شريط المعاينة باللون الأسود ويظهر الجانب الأيمن باللون الأبيض. لكن يمكننا تحرير الألوان باستخدام التوقفات اللونية.
لتغيير اللون الأسود إلى شيء آخر ، انقر نقرًا مزدوجًا فوق توقف اللون الأسود أسفل الجانب الأيسر من شريط المعاينة:

ثم اختر لونًا جديدًا من Color Picker في Photoshop. يمكنك استخدام أي ألوان تريدها. سأختار الوردي الصامت عن طريق تعيين R قيمة (الأحمر) إلى 146 ، و G قيمة (الأخضر) إلى 116 و B قيمة (الأزرق) إلى 137 . انقر فوق موافق لإغلاق Color Picker عند الانتهاء:

ثم لتغيير اللون الأبيض إلى شيء آخر ، انقر نقرًا مزدوجًا فوق توقف اللون الأبيض أسفل الجانب الأيمن من شريط المعاينة:
إقرأ أيضا:تغيير خلفيات تأثير النص في Photoshop
واختر لونًا جديدًا من Color Picker. هذه المرة ، سأختار اللون الوردي المحمر الفاتح عن طريق ضبط R على 237 و G إلى 214 و B إلى 222 . انقر فوق “موافق” عند الانتهاء:

بعد تحرير كلا اللونين ، لدينا الآن تدرج مخصص جديد:

الخطوة 4: اضبط موقع كل لون على 50٪
في الوقت الحالي ، تنتقل الألوان في التدرج تدريجياً من واحدة إلى أخرى. لإنشاء تدرج لوني صلب يقسم اللونين لأسفل في المنتصف ، ما عليك سوى تغيير قيمة الموقع لكل توقف لوني.
أولاً ، انقر فوق توقف اللون الأيسر لتحديده. لا تنقر نقرًا مزدوجًا هذه المرة ، فقط انقر مرة واحدة:

ثم قم بتغيير قيمة الموقع من 0٪ إلى 50٪ . ستتحرك نقطة توقف اللون أسفل مركز التدرج:

ثم انقر فوق التوقف اللوني الصحيح لتحديده:

وتغيير قيمة الموقع أيضًا إلى 50٪ . يتداخل التوقفان اللونيان الآن في المركز ويتم تعبئة كل نصف من التدرج بلون خالص:
إقرأ أيضا:كيفية إضافة تاثيرات متعددة حول النص بالفوتوشوب
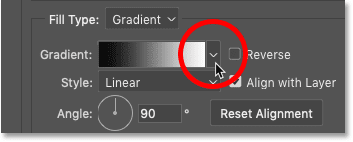
كيفية تبديل ترتيب الألوان
بناءً على الترتيب الذي حددت به توقفات اللون ، قد تكون الألوان في التدرج اللوني قد بدلت جوانبها. لتبديلها مرة أخرى ، ما عليك سوى النقر فوق أي لون يظهر أسفل منتصف شريط المعاينة:

الخطوة 5: احفظ التدرج اللوني كإعداد مسبق جديد
إذا كنت ترغب في تطبيق التدرج ليس فقط على النص الخاص بك ولكن أيضًا على الحد أو الخلفية (وهو ما سنفعله بعد قليل) ، فقبل إغلاق محرر التدرج اللوني ، احفظ التدرج كإعداد مسبق جديد.
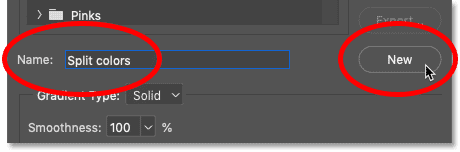
لكن أولاً ، إذا كنت تستخدم Photoshop CC 2020 أو إصدارًا أحدث ، فأغلق مجلد الأساسيات في منطقة الإعدادات المسبقة. سيؤدي ترك المجلد مفتوحًا إلى إضافة الإعداد المسبق الجديد إلى المجلد ، وهذا ليس ما نريده:
أعط اسمًا لإعدادك المسبق. سأسمي “ألوان الانقسام”. ثم انقر فوق الزر ” جديد” لحفظه:
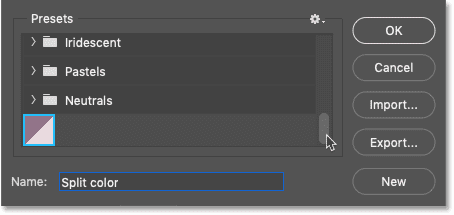
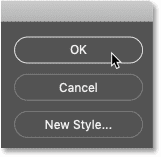
يظهر الإعداد المسبق الجديد كصورة مصغرة أسفل التدرجات الأخرى. في هذه المرحلة ، انتهينا من محرر التدرجات ، لذا انقر فوق موافق لإغلاقه. لكن اترك مربع الحوار Layer Style مفتوحًا:
هذا هو نصي بالألوان المنقسمة حتى الآن. النصف العلوي مليء باللون الفاتح من اللونين والنصف السفلي مليء باللون الغامق:

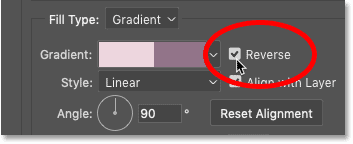
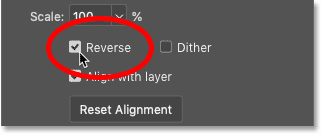
كيفية عكس الألوان
لتبديل موضع الألوان ، حدد خيار Reverse في شاشة Layer Style:
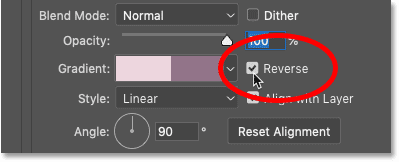
والآن أصبح اللون الأغمق في الأعلى واللون الأفتح في الأسفل. قم بإلغاء تحديد الخيار Reverse لاستبدالها مرة أخرى:

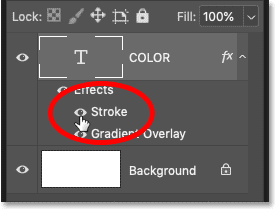
كيفية تطبيق ضربة لون منقسم حول النص
إذا كنت راضيًا عن التأثير في هذه المرحلة ، يمكنك إغلاق مربع الحوار Layer Style وتكون قد انتهيت. ولكن إليك كيف يمكنك تحسين التأثير من خلال تطبيق حد حول النص باستخدام نفس التدرج اللوني المنقسم.
الخطوة 1: أضف تأثير طبقة Stroke
لا يزال في مربع الحوار Layer Style ، انقر فوق كلمة Stroke في قائمة التأثيرات الموجودة على اليسار:

الخطوة 2: حدد التدرج اللوني المنقسم
قم بتغيير نوع تعبئة الحد من اللون إلى التدرج اللوني :

ثم انقر فوق السهم الصغير بجوار حامل التدرج اللوني:
وانقر نقرًا مزدوجًا فوق الصورة المصغرة للتدرج اللوني المنقسم لتحديده:

الخطوة 3: حدد الخيار العكسي
لرؤية الحد حول النص ، نحتاج إلى أن تكون ألوان التدرج بترتيب عكسي من طريقة ظهورها في النص نفسه. حتى إذا لم يكن اختيار عكسي الخيار للتأثير متدرجة التراكب، ثم حدد العكسية في خيارات السكتة الدماغية. أو إذا كنت فعلت تحديد عكسي لتراكب متدرجة، وترك عكس حالها لسكتة دماغية.
بعبارة أخرى ، مهما فعلت بخيار Reverse للنص نفسه (Gradient Overlay) ، فقم بالعكس بالنسبة للحد:
يجب أن يظهر الحد الآن كمخطط رفيع حول الحروف ، ويجب أن تكون الألوان في الحد بالترتيب المعاكس للنص. يجب أن يظهر النصف الداكن من الحد حول النصف الأفتح من النص ، ويجب أن يكون النصف الأفتح من الخط حول النصف الأغمق من النص:

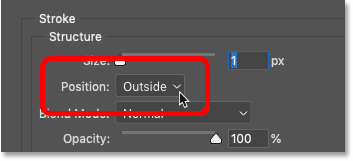
الخطوة 4: اضبط الوضع على الخارج
تغيير السكتة الدماغية في الوظيفة إلى خارج لذلك يبدو حول حواف خارج الحروف:
الخطوة 5: زيادة حجم ضربة الفرشاة
ثم استخدم منزلق الحجم لزيادة عرض الحد. سأضبط خاصتي على 16 بكسل:

وهذه هي النتيجة. لدينا الآن حد حول النص باستخدام نفس تأثير تقسيم اللون (ولكن معكوس):

الخطوة 6: أغلق مربع الحوار Layer Style
بعد ذلك ، سأوضح لك كيفية ملء الخلفية بتدرج لوني منقسم. ولكن في هذه المرحلة ، انتهينا من مربع الحوار Layer Style ، لذا انقر فوق موافق لإغلاقه:
كيفية ملء الخلفية بتدرج لوني منقسم
بدلاً من إضافة حد حول النص ، ماذا لو كنت تريد ملء الخلفية خلف النص بتدرج لوني منقسم ، بحيث تعكس الألوان في الخلفية والنص بعضها البعض؟ هيريس كيفية القيام بذلك.
الخطوة 1: قم بإيقاف تشغيل تأثير Stroke
أولاً ، إذا قمت بإضافة حد من القسم السابق ، ثم في لوحة Layers ، قم بإيقاف تشغيل الحد بالنقر فوق أيقونة الرؤية الخاصة بها أسفل طبقة الكتابة:
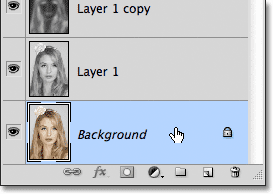
الخطوة 2: حدد طبقة الخلفية
لا يزال في لوحة Layers ، انقر فوق طبقة الخلفية لتحديدها:
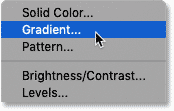
الخطوة 3: أضف طبقة تعبئة متدرجة
ثم انقر فوق أيقونة New Fill أو Adjustment Layer في الأسفل:
![]()
واختر طبقة تعبئة متدرجة من القائمة:
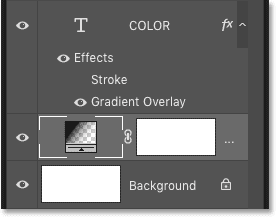
و طبقة تعبئة متدرجة يظهر بين طبقة الكتابة والطبقة الخلفية:
الخطوة 4: اختر التدرج اللوني المنقسم
في مربع الحوار Gradient Fill ، انقر فوق السهم الموجود على يمين حامل التدرج اللوني:

ثم انقر نقرًا مزدوجًا فوق الصورة المصغرة للتدرج اللوني المنقسم لتحديده:

الخطوة 5: عكس ألوان التدرج
تمامًا كما هو الحال مع الحد ، يجب أن تكون ألوان الخلفية بترتيب عكسي للنص ، وإلا سيختفي النص من العرض.
لذلك إذا لم تقم بتحديد الخيار Reverse للنص (تأثير Gradient Overlay) ، فحدد Reverse في مربع الحوار Gradient Fill. وإذا لم تحديد العكسي للنص، ثم ترك عكسي في مربع الحوار تعبئة متدرجة دون رادع:
انقر فوق OK لإغلاق مربع الحوار Gradient Fill ، وسيظهر التدرج اللوني المنقسم خلف النص بترتيب عكسي لكيفية ظهوره داخل الحروف.
المشكلة الوحيدة ، على الأقل في حالتي ، هي أن التدرج اللوني في النص لا يصطف مع التدرج اللوني في الخلفية. لذلك سأصلح ذلك بعد ذلك:

الخطوة 6: انقل النص إلى موضعه
لنقل النص إلى موضع بحيث يصطف التدرجان ، حدد أولاً طبقة الكتابة في لوحة Layers:

ثم في شريط الأدوات ، حدد أداة التحريك :

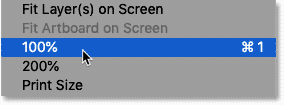
وقبل نقل النص ، انتقل إلى قائمة عرض في شريط القوائم واختر 100٪ . يؤدي هذا إلى تكبير المستند إلى وضع العرض بنسبة 100٪ والذي يسمح لك بدفع النص بمقدار بكسل واحد في كل مرة:
مع تحديد أداة التحريك وعرضك بنسبة 100٪ ، استخدم مفتاح السهم لأعلى أو لأسفل على لوحة المفاتيح لدفع النص إلى مكانه. في حالتي ، سأقوم بدفع النص لأسفل بمقدار بكسل واحد في كل مرة حتى تتم محاذاة نقاط الانقسام الأفقي للتدرج في النص والتدرج في الخلفية:


